Migrate AWS EC2 to Azure VM using XMigrate


Migrate AWS EC2 to Azure VM using XMigrate

Event Date: Jan 26 2021

In this session, we will learn how to migrate AWS EC2 instances to Azure VMs with the help of Xmigrate. Xmigrate (pronounced as cross-migrate) is an opensource tool for migrating your VM’s from anywhere to cloud and cloud to anywhere seemlesly. Xmigrate aims to help you to move your server, which is deployed in any X environment to Y public cloud platform. Here X can be on-prem or public cloud vendors like AWS, Azure, GCP etc and Y can be a public cloud platform.
Refer this article for more details related to Xmigrate: https://medium.com/xmigrateoss/xmigrate-explained-cf019418df1b

Azure App Service Backup Failure Alert

The Backup feature in Azure App Service allows us to easily create app backups manually or on a schedule. Refer this blog to know more about how to configure backup in Azure Web App:

https://www.iamashishsharma.com/2021/01/configure-backup-for-your-azure-app.html

In this article, we will discuss how to create an alert which will get triggered whenever backup of web app will fail.

Go to Alerts and create new alert rule.

Select your Azure web app for which you want to configure backup failure alert.

Click on Condition and Search “Create Web App Backup”.

Then change the Status to “Failed” and click on “Done”.

This will create a condition which will trigger whenever any backup will fail in Azure Web App.

Click on Action Groups and then you can select a existing action group. Otherwise click on Create action group.

Select your subscription and resource group. Enter your action group name.

Select your Notification method. I have added Email in the notification type as shown below. You can also add Webhook etc from Actions tabs.


Then click on review and create.

Enter your alert rule details such as alert name ,description and save alert to your resource group.

Click on Create alert rule.

This will create an alert rule which will get triggered whenever Azure web app backup will fail.

Configure a Backup for your Azure App Service

The Backup feature in Azure App Service allows us to easily create app backups manually or on a schedule. You can restore the app to a snapshot of a previous state by overwriting the existing app or restoring to another app.

Refer the below steps to schedule your backup:

1. Go to your App service and click on Backups from left Navigation bar.

2. Click on Configure and select your Azure storage account and container to store your backup. Then configure the schedule to start your backup as illustrated below.

3. Once everything is configured you can see backup status as shown below.

4. Once backup is succeeded, you can see the next scheduled backup details.

Exclude files from your backup

If you want to exclude few folders and files from being stored in your backup, then you can create _backup.filter file inside D:\\home\\site\\wwwrootfolder of your web app.

Let’s assume you want to exclude Logs folder and ashish.pdf file.

Then create _backup.filter file and add file & folder details inside the file as shown below.

Now, any files and folders that are specified in _backup.filter is excluded from the future backups scheduled or manually initiated.

Configure Azure web app backup using Powershell:

Refer the below powershell sample:
  
$webappname=\"mywebapp$(Get-Random -Minimum 100000 -Maximum 999999)\"
$storagename=\"$($webappname)storage\"
$container=\"appbackup\"
$location=\"West Europe\"

# Create a resource group.
New-AzResourceGroup -Name myResourceGroup -Location $location

# Create a storage account.
$storage = New-AzStorageAccount -ResourceGroupName myResourceGroup `
-Name $storagename -SkuName Standard_LRS -Location $location

# Create a storage container.
New-AzStorageContainer -Name $container -Context $storage.Context

# Generates an SAS token for the storage container, valid for 1 year.
# NOTE: You can use the same SAS token to make backups in Web Apps until -ExpiryTime
$sasUrl = New-AzStorageContainerSASToken -Name $container -Permission rwdl `
-Context $storage.Context -ExpiryTime (Get-Date).AddYears(1) -FullUri

# Create an App Service plan in Standard tier. Standard tier allows one backup per day.
New-AzAppServicePlan -ResourceGroupName myResourceGroup -Name $webappname `
-Location $location -Tier Standard

# Create a web app.
New-AzWebApp -ResourceGroupName myResourceGroup -Name $webappname `
-Location $location -AppServicePlan $webappname

# Schedule a backup every day, beginning in one hour, and retain for 10 days
Edit-AzWebAppBackupConfiguration -ResourceGroupName myResourceGroup -Name $webappname `
-StorageAccountUrl $sasUrl -FrequencyInterval 1 -FrequencyUnit Day -KeepAtLeastOneBackup `
-StartTime (Get-Date).AddHours(1) -RetentionPeriodInDays 10

# List statuses of all backups that are complete or currently executing.
Get-AzWebAppBackupList -ResourceGroupName myResourceGroup -Name $webappname

References: 

Restore a deleted Azure Web App

If you have accidently deleted your Azure Web App and looking to restore it, then refer the below steps to restore your Azure Web App.

1. Run the below Powershell to get the details of deleted web app.

Get-AzDeletedWebApp -Name <>

2. Restore the web app.

Restore-AzDeletedWebApp -ResourceGroupName <> -Name <> -TargetAppServicePlanName <>


You can also check Activity logs of restored web apps as illustrated below.

Note:

1. Deleted apps are purged from the system 30 days after the initial deletion. After an app is purged, it can\’t be recovered.

2. Undelete functionality isn\’t supported for the Consumption plan.

3. Apps Service apps running in an App Service Environment don\’t support snapshots. Therefore, undelete functionality and clone functionality aren\’t supported for App Service apps running in an App Service Environment.

References: https://docs.microsoft.com/en-us/azure/app-service/app-service-undelete

Top 50 Microsoft Azure Blogs, Websites & Influencers in 2020

I am really glad to share that my blog is listed among Top 50 Microsoft Azure Blogs, Websites & Influencers in 2020. I am honored to be on this huge list next to other top contributors out of Microsoft Azure communities.

Check out the list and browse through all the great Azure blogs: https://blog.feedspot.com/microsoft_azure_blogs/

Azure Heroes: Content Hero & Community Hero Badger

Today I was awarded with 2 Azure Heroes: Content Hero badger & Community Hero Badger.

If you are not aware of what the Azure Heroes program is, let me explain it to you. Azure Heroes is a new recognition program by Microsoft, which recognizes the members of the technical community with digital badgers for meaningful acts of impact. It’s a blockchain-based recognition program where Microsoft collaborated with Enjin, this blockchain technology is being used for issuance and transactions which means that as a recipient of tokenised badger, you take the ownership of a digital collectible in the form of a non-fungible token (NFT).


Content Hero badgers are given out to those who share valuable knowledge at conferences, meetups or other events. The recipients of this rare award have created original content, sample code or learning resources and documented and shared their experiences and lessons to help others to build on Azure.


Community Hero badgers are given out for contributing materially by organising meetups or conferences or by sharing content and being an active member of the community.

Check other badger categories: Azure Heroes

Find All Azure Heroes: https://www.azureheroes.community/map

My Profile: https://www.azureheroes.community/user/11387

Security Recommendations for Azure App Services

In this article, we will cover the security recommendations that you should follow for establishing a secure baseline configuration for Microsoft Azure App Services on your Azure Subscription.

1. Ensure that App Service’s stack settings should be latest

Newer versions may contain security enhancements and additional functionality. Using the latest software version is recommended to take advantage of enhancements and new capabilities. With each software installation, organizations need to determine if a given update meets their requirements and verify the compatibility and support provided for any additional software against the update revision that is selected.

Steps:

1. Open your App Service and click on Configuration under Settings section.

2. Go to General Settings and ensure that your stack should be set to latest version. In the below example, our stack is PHP. Hence, we will select latest PHP version i.e. PHP 7.4


Similarly, in case you are using other stacks like .Net, Python, Java etc. then make sure it should set to latest version. Periodically newer versions are released for software either due to security flaws or to include additional functionality. Using the latest version for web apps is recommended to take advantage of security fixes, if any, and/or additional functionalities of the newer version.

2. HTTP version should be latest

Newer versions may contain security enhancements and additional functionality. Using the latest version is recommended to take advantage of enhancements and new capabilities. With each software installation, organizations need to determine if a given update meets their requirements and also verify the compatibility and support provided for any additional software against the update revision that is selected. HTTP 2.0 has additional performance improvements on the head-of-line blocking problem of old HTTP version, header compression, and prioritization of requests. HTTP 2.0 no longer supports HTTP 1.1\’s chunked transfer encoding mechanism, as it provides its own, more efficient, mechanisms for data streaming.

Steps:

1. Open your App Service and click on Configuration under Settings section.

2. Go to General Settings and ensure that HTTP version should be set to latest version. In the below example, the latest HTTP version is 2.0.

3. Disable FTP deployments

Azure FTP deployment endpoints are public. An attacker listening to traffic on a Wi-Fi network used by a remote employee or a corporate network could see login traffic in cleartext which would then grant them full control of the code base of the app or service. This finding is more severe if User Credentials for deployment are set at the subscription level rather than using the default Application Credentials which are unique per App.

Steps:

1. Open your App Service and click on Configuration under Settings section.

2. Go to General Settings and ensure that FTP state should not be All Allowed.


4. Enable Client Certificates mode

Client certificates allow for the app to request a certificate for incoming requests. Only clients that have a valid certificate will be able to reach the app. The TLS mutual authentication technique in enterprise environments ensures the authenticity of clients to the server. If incoming client certificates are enabled, then only an authenticated client who has valid certificates can access the app.

Steps:

1. Open your App Service and click on Configuration under Settings section.

2. Go to General Settings and ensure that Client certificate mode should be set to Require.


5. Redirect HTTP traffic to HTTPS

Enabling HTTPS-only traffic will redirect all non-secure HTTP request to HTTPS ports. HTTPS uses the SSL/TLS protocol to provide a secure connection, which is both encrypted and authenticated. So it is important to support HTTPS for the security benefits.

Steps:

1. Open your App Service and click on TLS/SSL settings under Settings section.

2. Go to Bindings and set HTTPS Only to ON.

When it is enabled, every incoming HTTP request are redirected to the HTTPS port. It means an extra level of security will be added to the HTTP requests made to the app.


6. Use the latest version of TLS encryption

The TLS(Transport Layer Security) protocol secures transmission of data over the internet using standard encryption technology. Encryption should be set with the latest version of TLS. App service allows TLS 1.2 by default, which is the recommended TLS level by industry standards, such as PCI DSS. App service currently allows the web app to set TLS versions 1.0, 1.1 and 1.2. It is highly recommended to use the latest TLS 1.2 version for web app secure connections.

Steps:

1. Open your App Service and click on TLS/SSL settings under Settings section.

2. Go to Bindings and ensure that TLS Version should be latest version. Here the latest version is 1.2.


7. Enable App Service Authentication

Azure App Service Authentication is a feature that can prevent anonymous HTTP requests from reaching the API app, or authenticate those that have tokens before they reach the API app.

By Enabling App Service Authentication, every incoming HTTP request passes through it before being handled by the application code. It also handles authentication of users with the specified provider(Azure Active Directory, Facebook, Google, Microsoft Account, and Twitter), validation, storing and refreshing of tokens, managing the authenticated sessions, and injecting identity information into request headers.

Steps:

1. Open your App Service and click on Authentication / Authorization under Settings section.

2. Set App Service Authentication to ON

If an anonymous request is received from a browser, App Service will redirect to a logon page. To handle the logon process, a choice from a set of identity providers can be made, or a custom authentication mechanism can be implemented.


8. Enable System Assigned Managed Identity

Managed service identity in App Service makes the app more secure by eliminating secrets from the app, such as credentials in the connection strings. When registering with Azure Active Directory in the app service, the app will connect to other Azure services securely without the need of username and passwords.

Steps:

1. Open your App Service and click on Identity under Settings section.

2. Set the Status to ON


References:

https://docs.microsoft.com/en-us/azure/app-service/web-sites-configure#general-settings

https://docs.microsoft.com/en-us/azure/security/benchmarks/security-controls-v2-governance-strategy#gs-6-define-identity-and-privileged-access-strategy

https://docs.microsoft.com/en-us/azure/app-service/app-service-authentication-overview

https://docs.microsoft.com/en-us/azure/security/benchmarks/security-controls-v2-identity-management#im-1-standardize-azure-active-directory-as-the-central-identity-and-authentication-system


Security Recommendations for Azure SQL Database

In this article, we will cover the security recommendations that you should follow for establishing a secure baseline configuration for Microsoft Azure SQL Services on your Azure Subscription.

1. Enable auditing on SQL Servers & SQL databases:

The Azure platform allows you to create a SQL server as a service. Enabling auditing at the server level ensures that all existing and newly created databases on the SQL server instance are audited.
Auditing tracks database events and writes them to an audit log in your Azure storage account. It also helps you to maintain regulatory compliance, understand database activity, and gain insight into discrepancies and anomalies that could indicate business concerns or suspected security violations.

Steps:

For Azure SQL Server:
1. Go to Azure SQL Server and click on Auditing.
2. Enable Azure SQL Auditing and select your Storage account. You can also select either Log analytics or Event Hub.
For Azure SQL Database:
1. Go to Azure SQL Server and click on Auditing.
2. Enable Azure SQL Auditing and select your Storage account. You can also select either Log analytics or Event Hub.

2. Enable threat detection on SQL Servers & SQL databases:

SQL Threat Detection provides a new layer of security, which enables customers to detect and respond to potential threats as they occur by providing security alerts on anomalous activities. Users will receive an alert upon suspicious database activities, potential vulnerabilities, and SQL injection attacks, as well as anomalous database access patterns. SQL Threat Detection alerts provide details of suspicious activity and recommend action on how to investigate and mitigate the threat.

Steps:

1. Go to Azure SQL server and click on Security Center.
2. Enable AZURE DEFENDER FOR SQL.
3. Select your storage account.
4. Enable Periodic recurring scans & enter your email account where you can receive scan reports. Also select to send email notifications to admins & subscription owners.
5. Enter your email account to which alerts will be sent for the detection of anomalous activities as illustrated in below image. Providing the email address to receive alerts ensures that any detection of anomalous activities is reported as soon as possible, making it more likely to mitigate any potential risk sooner. Always enable service and co-administrators to receive security alerts from SQL Server.
6. Set Threat Detection types to All. Enabling all threat detection types will help you to protect against SQL injection, database vulnerabilities and any other anomalous activities.
You can enable Azure Defender at SQL database level as well but it is recommended to enable Azure Defender at SQL Server level unless you want to generate alerts for the SQL database.

3. Configure Retention policy greater than 90 days.

Ensure that SQL Server & SQL database Audit Retention & Threat Detection Retention should be configured to be greater than 90 days. Audit Logs can be used to check for anomalies and give insight into suspected breaches or misuse of information and access.
Threat Detection Logs can be used to check for suspected attack attempts and breaches on a SQL server with known attack signatures.

4. Use Azure Active Directory Authentication for authentication with SQL Database

Azure Active Directory authentication is a mechanism of connecting to Microsoft Azure SQL Database and SQL Data Warehouse by using identities in Azure Active Directory (Azure AD). With Azure AD authentication, you can centrally manage the identities of database users and other Microsoft services in one central location. Central ID management provides a single place to manage database users and simplifies permission management.
It provides an alternative to SQL Server authentication.
Helps stop the proliferation of user identities across database servers.
Allows password rotation in a single place
Customers can manage database permissions using external (AAD) groups.
It can eliminate storing passwords by enabling integrated Windows authentication and other forms of authentication supported by Azure Active Directory.
Azure AD authentication uses contained database users to authenticate identities at the database level.
Azure AD supports token-based authentication for applications connecting to SQL Database.
Azure AD authentication supports ADFS (domain federation) or native user/password authentication for a local Azure Active Directory without domain synchronization.
Azure AD supports connections from SQL Server Management Studio that use Active Directory Universal Authentication, which includes Multi-Factor Authentication (MFA). MFA includes strong authentication with a range of easy verification options — phone call, text message, smart cards with pin, or mobile app notification.

5. Enable Data encryption on SQL database

Azure SQL Database transparent data encryption helps protect against the threat of malicious activity by performing real-time encryption and decryption of the database, associated backups, and transaction log files at rest without requiring changes to the application.

Steps:

1. Go to Azure SQL Database & select Transparent Data Encryption.
2. Set Data encryption to ON.

References:

Configure Sitecore Publishing Service in Azure App Service

In this article, we will set up and configure Sitecore Publishing Service in Azure App Service.

1. Download Publishing service & module

You can download from dev.sitecore.com.

Sitecore Publishing Service: It is an opt-in module providing an alternative to the default Sitecore publishing mechanism, focusing on increased performance by doing operations in bulk. I have downloaded \”Sitecore Publishing Service 4.3.0\”.

Sitecore Publishing Service Module : It provides integration with the opt-in Publishing Service, supporting high-performance publishing in large scale Sitecore setups.


2. Install & Configure publishing service in Azure App Service

2.1 Create Azure App service.

Once the App Service is created, open Kudu & navigate to Debug Consule -> CMD. Navigate to site\\wwwroot folder.

Drag & Drop zip folder “Sitecore Publishing Service 4.3.0-win-x64.zip” to kudu folder view area. You can unzip the folder using below command.

unzip -o *.zip

2.2 Run the below commands in Kudu CMD to set connection strings of core, web & master databases in publishing service.

Sitecore.Framework.Publishing.Host configuration setconnectionstring core \”\”

Sitecore.Framework.Publishing.Host configuration setconnectionstring master \”\”

Sitecore.Framework.Publishing.Host configuration setconnectionstring web\”\”

2.3 Upgrade the database schema for Sitecore publishing service using the below command.

Sitecore.Framework.Publishing.Host schema upgrade –force

2.4 To validate the configurations, navigate to browser and open the Publishing service URL as shown below:

http://<&gt;.azurewebsites.net/api/publishing/maintenance/status

It should return “status”: 0 as illustrated below:

3. Configure Sitecore Publishing module in CD & CM instance

3.1 Login to CM instance and use Installation Wizard to install Publishing module.

3.2 Once the module is installed, open CM App service -> Open Kudu.

Navigate to App_Config/Modules/PublishingService folder and open Sitecore.Publishing.Service.config

Replace http://localhost:5000/ with the URL of the Publishing service App Service.

3.3 Now download Sitecore.Publishing.Service.Delivery.configfrom App_Config/Modules/PublishingService folder and the below dll from the bin folder from CM instance.

  • Sitecore.Publishing.Service.dll
  • Sitecore.Publishing.Service.Abstractions.dll
  • Sitecore.Publishing.Service.Delivery.dll

3.4 Open the CD App service -> Open Kudu. Upload downloaded Sitecore.Publishing.Service.Delivery.config in App_Config/Modules/PublishingServicefolder and the downloaded dll in the bin folder. 

Now you can see Publishing icon in Launchpad and on clicking it, you can see list of Active, Queued & Recent jobs in the Publishing dashboard.

If you have any feedback, questions or suggestions for improvement please let me know in the comments section.

Install Solr as an Azure App Service

After Sitecore 9.0.2, Solr is a supported search technology for Sitecore Azure PAAS deployments. In this article, we will install SOLR service 8.4.0 in Azure App Service for Sitecore 10.

1. Create Azure App Service

Login to Azure and create Azure App service.

Make sure Runtime stack should be Java.

2. Download Solr

Download Solr 8.4.0 from https://archive.apache.org/dist/lucene/solr/

Extract the files and add the below web.config file in the Solr package.


     <add  name="httpPlatformHandler"

           path=\”*\”

           verb=\”*\”

           modules=\”httpPlatformHandler\”

           resourceType=\”Unspecified\” />


   <httpPlatform processPath="%HOME%\\site\\wwwroot\\bin\\solr.cmd"

       arguments=\”start -p %HTTP_PLATFORM_PORT%\”

       startupTimeLimit=\”20\”

       startupRetryCount=\”10\”

       stdoutLogEnabled=\”true\”>


3. Deployment

You can use FTP to copy the local Solr files to the web root of the App Service. 

Go to Deployment Center and copy the FTPS endpoint, Username & Password.

Then you can use any FTP tool such as FileZilla to copy the local Solr files to /site/wwwroot folder of App service.

Once all the files will be copied, restart the App Service.

Browse the App Service URL, you will see the Solr Dashboard & you can use this Solr in Sitecore instances for indexing

EXM not visible in Sitecore 10 Launchpad

After Sitecore 10 Installation, you might have seen EXM app is not visible in Launchpad. 

Click on Installed Licenses, you will get the list of modules that are covered in your license & we found that EXM was not there in the list. 

To solve this issue, contact Sitecore Sales Representative & ask for the license with EXM module. Then replace the License in Sitecore instances & login to Sitecore and see the Launchpad. You will find EXM app in the launchpad.

References: https://doc.sitecore.com/users/exm/100/email-experience-manager/en/index-en.html

Install Horizon module in Sitecore 10

In this article, we will install Horizon module in Sitecore 10. To install Sitecore 10 using SIA, you can refer my this article: https://www.iamashishsharma.com/2020/08/install-sitecore-10-using-sitecore.html.

Refer the below steps to install Horizon module:

1. Download Horizon module from here.

2. Extract the downloaded zip folder and then open InstallHorizon.ps1into Windows PowerShell ISE in administrator mode.

Update the variables

$horizonInstanceName: Name of Horizone instance

$sitecoreCmInstanceName: Name of the Sitecore instance created in IIS via SIA

$identityServerPoolName: Name of the Sitecore identity instance created in IIS via SIA

$LicensePath: Path to where your licence file can be found

$enableContentHub: To enable Content hub then set it as true

Once the script will be completed successfully, a new website horizon will be created. Login to Sitecore and you can see additional icon for horizon in launchpad. Click on the icon and you can see new Horizon website.

Install Sitecore 10 using Sitecore Install Assistant

This article will show the steps to install Sitecore 10 on your local machine using Sitecore Install Assistant.

1. Go to dev.sitecore.net page and download Sitecore 10. I have downloaded XP single but you can choose other options as well for on premise.

2. Extract the downloaded zip folder and then run the \”setup.exe\” file with Administrator.

3. Click on Start button to start your installation.

4. Install Prerequisites to make sure the required SIF and Windows Server prerequisites are up to date.

5. Enter Sol port, prefix and path to Install Solr.

This will install Solr version 8.4.0. Browse your Solr url to make sure it’s running successfully.

6. Enter your Sitecore prefix, password and browse Sitecore license file.

7. Enter SQL Server details.

8. Confirm your Solr details.

9. In case you want to install SXA then select this option.

10. Review the summary details and then click on Next button.

11. This step will validate all the parameters. Once all parameters will be validated, you can click on Install to start Sitecore installation.

12. Once the installation will be completed, you can open the Sitecore instance.


Log into it by using account admin / Sitecore Admin Password)

If you have any feedback, questions or suggestions for improvement please let me know in the comments section.

Secure your Sitecore environment using Azure Private Link

Overview of Private Link:

A Private Endpoint is a special network interface (NIC) for your Azure Web App in a Subnet in your Virtual Network (VNet). The Private Endpoint is assigned an IP Address from the IP address range of your VNet. The connection between the Private Endpoint and the Web App uses a secure Private Link.

Private Link enables you to host your apps on an address in your Azure Virtual Network (VNet) rather than on a shared public address. It provides secure connectivity between clients on your private network and your Web App. By moving the endpoint for your app into your VNet you can:

1. Isolate your apps from the internet: Configuring a Private Endpoint with your app, you can securely host line-of-business applications and other intranet applications.

2. Prevent data exfiltration: Since the Private Endpoint only goes to one app, you don’t need to worry about data exfiltration situations.

Referemce: https://docs.microsoft.com/en-us/azure/app-service/networking/private-endpoint

If you just need a secure connection between your VNet and your Web App,  this is the simplest solution. If you also need to reach the web app from on-premises through an Azure Gateway, a regionally peered VNet, or a globally peered VNet, Private Endpoint is the solution.


Private Link vs App Service Environment: The difference between using Private Endpoint and an ILB ASE is that ASE can host many apps behind one VNet address while Private Endpoint can have only one app behind one address.

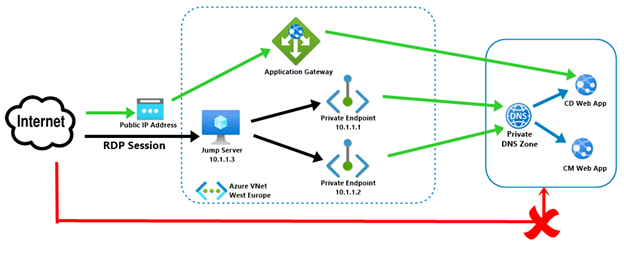
To access your Sitecore instances (CD or CM roles) in your VNet was previously possible via ILB App Service Environment or Azure Application Gateway with an internal inbound address. In this article, we will create Private Endpoint & isolate Sitecore environment from the Internet.

Once we will implement the above architecture, then:

1. Sitecore CD & CM web app’s public access will be disabled.

2. User can access CD instance via Application gateway public IP address. User needs to map his domain name with Application gateway.

3. To access CM instance, users need to use RDP session via Jump Server.


Follow the below steps to configure Azure Private Link for Sitecore web instances:

1. Go to CD instance’s App service plan & change the plan to P1v2. Currently, Private endpoint is only available in PremiumV2 plans.

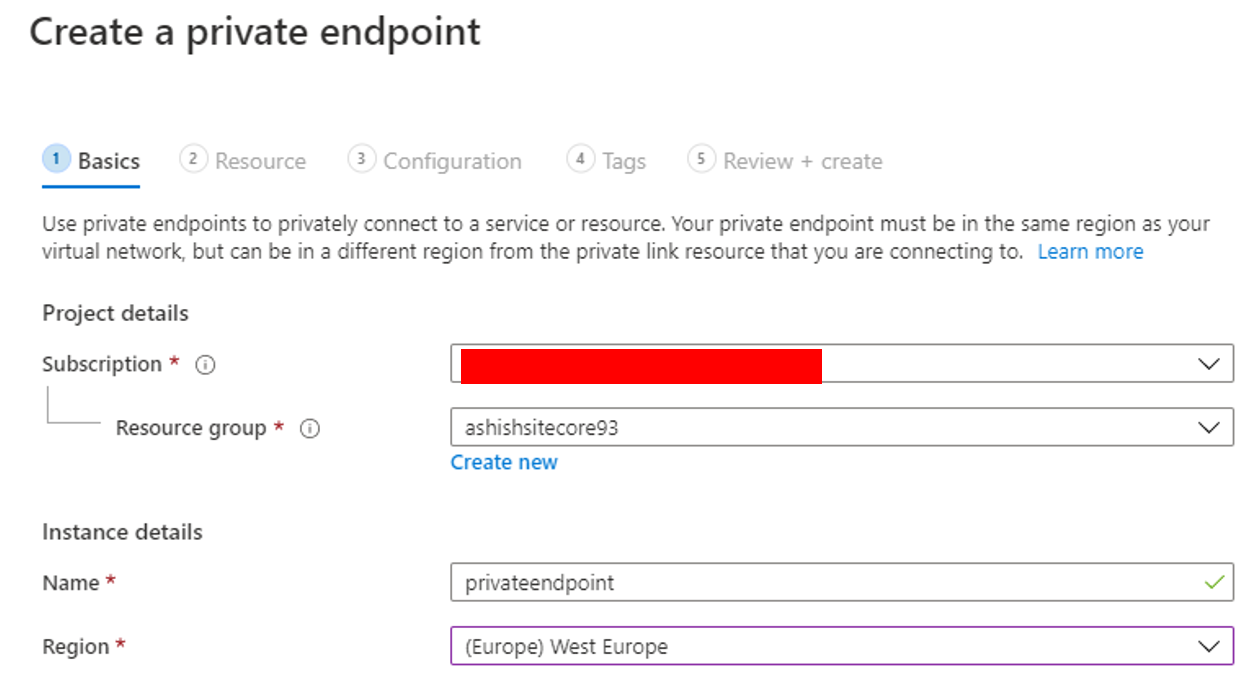
2. Create Private Endpoint. Select your Subscription & Resource Group and then enter Endpoint name & select your location as shown below.

3. In Resource type, select Microsoft.Web/sites and then select your CD instance.

4. I already have Virtual Network, hence I have selected the existing virtual network. Then configure your Private DNS integration as illustrated below.

5. Perform the above steps (1-4) for CM instance.

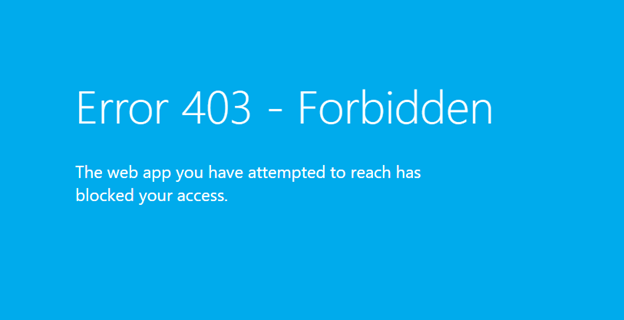
6. Open your CD & CM instance in your browser. Now you will be unable to access CD & CM instances.

7. Create a virtual machine in same Virtual Network. Open the RDP port so that this VM can act as Jump Server.

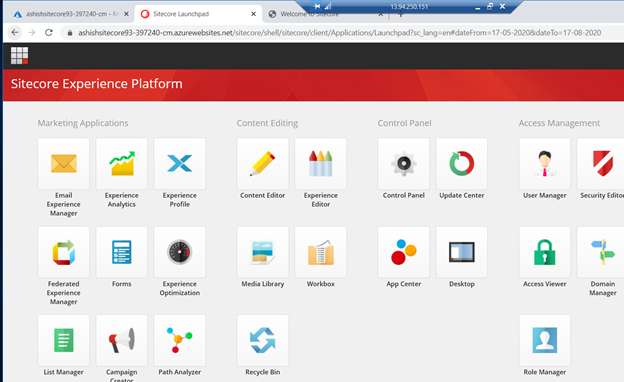
8. Once VM will be deployed, create a RDP session and browse your CD & CM instance. You should be able to access both CD & CM instances.


9. To access CD instance publicly, create an Azure Application Gateway.

9.1. Select the same Virtual Network that you have selected in above steps.

9.2. Create new Public IP address

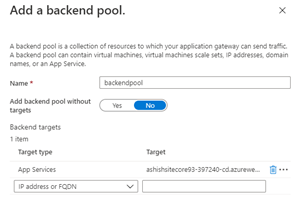
9.3. In backend pool, select your CD instance.

9.4. Add routing rule. Create a listener and upload HTTPs certificate as shown below.

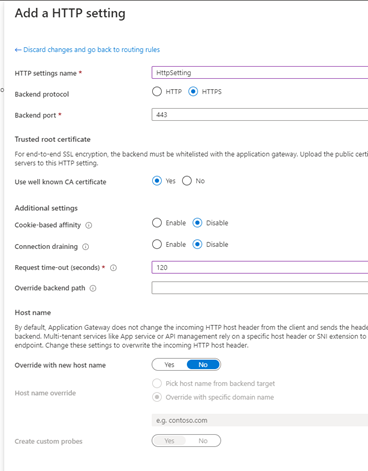
Create HTTP setting as illustrated below.

9.5. Once Application gateway will be deployed, check your backend health.

10. Navigate Application Gateway’s IP address in browser. You will be able to access CD instance publicly and your instance is secured by Private IP & your requests go through a Virtual Network.

I hope this information helped you. If you have any feedback, questions or suggestions for improvement please let me know in the comments section.

Publish items to a Preview Publishing target

Whenever there is a requirement to review the site changes before publishing it to live site. In this scenario, we need to enable normal view mode for our users, so that they can review changes before reaching to final state of workflow to publish to public site. This can be done using Sitecore\’s feature Preview Publishing Target. Adding a preview publishing target in Sitecore will allow your content approvers to preview it before making it available for whole world through your website.

Refer the below steps to configure preview publishing target:

1. Clone your CD instance. Refer this article which describes about how to clone your Azure web apphttps://www.iamashishsharma.com/2020/08/cloning-azure-app-services.html

2. Export your web database & import it named as preview-db in SQL Server.

3. Replace the web database connection string with preview database in CD instance. For example:

4. Add preview database connection string in CM instance


5. Add database node in Sitecore.config in CM instance inside databases node as refer below. (search in Sitecore.config)

  $(id)

      Images/database_web.png

      true


          publishing


        100MB

        50MB

        2500KB

        50MB

        2500KB


            $(id)


6. Then Add eventQueueprovider node inside eventing node (Search for ) 


7. Add propertystore in Sitecore.PropertyStore.config in CM instance


8. Create a new folder “Preview” inside  App_Config/Include folder. Then create new config Sitecore.ContentSearch.Solr.Index.Preview.config in App_Config/Include/Previewfor Solr preview indexing \”sitecore_preview_index\” in both CD & CM instance. Copy the below content in config file.


<configuration xmlns:patch="http://www.sitecore.net/xmlconfig/\” xmlns:role=\”http://www.sitecore.net/xmlconfig/role/\” xmlns:search=\”http://www.sitecore.net/xmlconfig/search/\”>


            preview

            true


            $(id)

            $(id)


                preview

                /sitecore


            false

            false


Perform in above step in both CD & CM instances.

9. Now Login to CM instance-> Content Editor. Then go Sitecore\\System\\Publishing Targets & Create new Publishing target & add Target database \”preview\”.

Then, validate the changes by publishing an item. It will also show “Preview” as publishing target.


10. Login to Solr and add new collection \”sitecore_preview_index and restart CM instance.

Validate the changes by rebuilding the search index. The index “sitecore_preview_index” can be shown as shown in below image.

I hope this information helped you. If you have any feedback, questions or suggestions for improvement please let me know in the comments section.

Cloning Azure App Services


Azure Web App Cloning is the ability to clone an existing Web App to a newly created app that is often in a different region. This will enable customers to deploy a number of apps across different regions quickly and easily.

Follow the below steps to clone your existing web app:

1. Go to App Service and click on Clone as shown below.

2. Enter your App name and select your Resource group.

3. You can select existing App Service plan or you can create a new one. Here, I have created a new App service plan in West Europe location of S1 Standard tier.

4. Click on Clone Settings & select the required settings you want to clone to new App service.

5. Select your existing Application Insights as illustrated below.

You can also create a new Application insight.

6. Click on Create, then your new App service will be created in few minutes.

Login to Sitecore instance using Azure Active directory

Refer the below steps to integrate Sitecore Identity Server with Azure AD.

1. Create Application in Azure AD

Create an application in Azure Active directory and in Redirect URI, add the URL of your Sitecore Identity resource with suffix \”/signin-oidc\”.

Once your application will be created. Go to Authentication & enable ID tokens as illustrated below.
Click Save and then Go to Manifest & change the value of the \”groupMembershipClaims\” setting to \”SecurityGroup\”. This will instruct Azure AD to pass along the identifiers of all Security Groups the authenticated user is a member of in the claims back to Sitecore Identity.
Click on Save & then copy Application ID & Directory (tenant) ID which will be required in next steps.
2. Update Sitecore Identity instance configuration
Go to Identity service and open /Sitecore/Sitecore.Plugin.IdentityProvider.AzureAd.xml file.
Change the Enabled node to true.
In the ClientId and TenantId nodes, paste the GUIDs copied in above step.
3. Map group membership in Active Directory to roles in Sitecore
In this step, map a group of Azure Active Directory, which will become Administrators in our Sitecore instance.
Copy the Object ID which will be required in next steps
Again, go to Identity service and open /Sitecore/Sitecore.Plugin.IdentityProvider.AzureAd.xml file and add groups that contains the Object ID of our Azure AD group. This claim is being passed from Azure AD to our Sitecore Identity Server & it tells Sitecore that this user is an Administrator.

4. CM instance Configuration for Authentication
Go to CM instance & open Sitecore.Owin.Authentication.IdentityServer.config file located in App_Config/Sitecore/Owin.Authentication.IdentityServer and uncomment identity provider “SitecoreIdentitySever/IdS4-AzureAd” as shown below.
5. Now let’s test this & login to Sitecore Instance using Azure AD. 


Enter your Azure AD credentials & your CM instance homepage will be opened.
I hope this information helped you. If you have any feedback, questions or suggestions for improvement please let me know in the comments section.

Comparison between Azure Search & Solr

Let\’s discuss some of the limitation of Azure Cognitive Search:
1. Substring searches that are limited to a single term, for instance, predicates, .StartsWith(), .EndsWith(), and .Contains()
2. Regular expressions spanning multiple terms (containing spaces) returns 0 results.
3. Multiple terms that are passed to .Wildcard() are interpreted as individual wildcards in a field-scoped query.
4. The facet values are calculated based on individual terms in faceted fields, not on whole field values, when a value contains multiple words, (unlike Lucene and Solr).
5. An Azure Cognitive Search index can only contain up to 1000 fields.
6. Join queries such as: .GroupJoin(), .SelfJoin(), and other operators that join queries, is not supported and results in an error.
7. Media indexing feature is not supported.
8. Range queries on string fields always operate on the whole field value without tokenization and are case-sensitive.

The above functionalities are working as expected in Solr Search. Let’s compare between Azure Search & Solr Search:
Azure Search
Solr
Max Simple fields per index
1000
No Limit
Max Complex collection fields per index
40
No Limit
Max elements across all complex collections per document
3000
No Limit
Max depth of complex fields
10
No Limit
Max suggesters per index
1
No Limit
Max scoring profiles per index
100
No Limit
Max functions per profile
8
No Limit
Please refer the below documentation to check Azure Search & Solr cost:
Conclusion: Solr\’s cost is same as Azure Search. Solr Search is more powerful than Azure Search. I would recommend to use Solr with Sitecore instances.
I hope this information helped you. If you have any feedback, questions or suggestions for improvement please let me know in the comments section.

Sitecore Content Hub

Sitecore announced the acquisition of Stylelabs in 2018 Symposium conference, later introduced a new product as the Sitecore Content Hub. Sitecore Content Hub is a marketing tool that gives users the ability to manage the entire content lifecycle in one place. Every aspect from planning, authoring and collaboration, through to management and curation, publication, personalization and feedback of analytics can be managed within Content Hub.
This product is still relatively unknown within the marketplace. So let’s discuss some components of Content Hub.

Content Crisis:

The situation of content crisis can be defined in the below problems:

  • Unable to deliver right content to right people on right time through right channels.
  • Lack of collaboration
  • Unable to reuse & lot of duplicate content
  • Most of the time spending on content finding

To mitigate this issue, Sitecore introduced Content Hub which is a complete SaaS solution, to do 360 degree Marketing Content Management. It includes several modules such as a PIM module, Content module, Project module and has Print & DRM capabilities/modules.

Content hub covers the entire content life cycle and manage every aspect of your marketing content for all your channels with a single, integrated solution. It presents four main capabilities:

  1. Digital Asset Management
  2. Content Marketing Platform
  3. Marketing Resource Management
  4. Product Content Management

Components

Digital Asset Management:

  • Solution of storage, management, distribution & control of digital assets.
  • Machine learning helps to tag your content
  • Search & find your assets quickly & easily.
  • Includes integrated Digital rights management to ensure full compliance
  • Handle any media type from photos, videos, source files, diagrams and more.

Content Marketing Platform

  • Effectively plan, manage & collaborate on content strategy.
  • Optimize content usage and distribute to target audiences across channels
  • Workflow process is available
  • Provides overall view of all content & how it is performing

Marketing Resource Management

  • Manage, budget, & control every phase of marketing project
  • Marketers can define and structure projects, campaigns, allocate budget & assign to stakeholders
  • Stakeholders can participate in process of content creating, reviewing, proofing & approving
  • Steer teams to achieve production targets on time with intuitive collaboration, review & approval tools

Product Content Management

  • Stores information related to products and manages your product marketing lifecycle
  • Centralise & automate all maintenace & management of product related content
  • Leverage existing product content as part of your processes for creating new content

For more detailed information related to Content Hub, refer the below articles:

In next article, we will discuss more on Content hub connectors & integration.

Certified Kubernetes Administrator

Certified Kubernetes Administrator exam is all about the types of tasks an administrator might need to perform as part of their job. It will involve more than just creating and destroying pods and their associated objects, and so the exam questions cover more than just YAML and kubectl. I consider myself lucky because for the past one & half years, I had the chance to work on Kubernetes in one of my projects. I regularly worked on improving my skills and studied for the exam, as it is one of the toughest and practical based exam.
This is one of the most difficult certifications that I have ever done. CKA exam is one of its kind with very rich content and about everything hands-on. The exam itself felt fair in terms of complexity and difficulty. You should know where to look in the Kubernetes docs to help you on more complex tasks and I mean knowing exactly where to look.

Preparation:
Firstly, I would advise you to download the exam study handbook and get an understanding of what is required of you. The structure of the exam is given below:
1. 3 hours
2. 24 questions
3. Pass mark of 74%
4. Remotely proctored
5. Chrome browser plus an extension
6. Government-issued non-expired ID
7. Webcam and microphone
8. Steady internet, preferably 5MB up/down.
9. Exam Cost: $300 and includes one free retake.
10.Ubuntu machines
You may refer the below clusters to practice:               
2. Minikube
Some additional useful links:

Exam Day:
You must meet all the requirements as mentioned in the exam handbook. Before starting the exam a proctor will ask to confirm your identity & will validate whether your working surface is clean (nothing around that can help).
The CKA is an exam that is kind of an open book test. You are allowed to have a single tab open to anything in the *.kubernetes.io or github.com/kubernetes. When you are solving a question and need a reference or an example, search for it in the documentation. Kubernetes.io has a great search function & you can refer to examples, copy-paste YAML text and commands.
There is a built-in notepad in the exam interface which might be handy since you\’re not allowed to write on paper during the exam.
Try to focus on the questions & read it very carefully in order to understand the requirements. Some questions are tricky in context therefore try to stay calm and avoid typing mistakes. I took around 2:30 hours to complete my exam.
So, practice, practice, and practice. This is a practical exam, no multiple-choice questions here.
Result:
In my case, I got results within 30 hours via an email after the completion of the exam. You will also receive an official email at the end of the exam informing you that the result will be declared within 36 hours.
I hope this article would be useful for you and please let me know in the comments if it somehow helped you to pass the exam.

Azure Synapse Analytics

Azure Synapse is an analytics service that combines analytics and data warehousing to create what the company calls “the next evolution of Azure SQL Data Warehouse.” You can login to your Azure Portal and search Azure Synapse & you will see “Azure Synapse Analytics (workspaces preview)”. Choose it and create Synapse workspace. Make sure before creating it, you need to register “Microsoft.Synapse” in your subscription.

Features of Azure Synapse Analytics:
Limitless scale GA Preview
Provisioned compute (data warehouse) Available NA
Materialized views & result-set cache Available NA
Workload importance Available NA
Workload isolation Available NA
Serverless data lake exploration NA Available
Powerful insights
Power BI integration NA Available
Azure Machine Learning integration NA Available
Streaming analytics (data warehouse) NA Available
Apache Spark integration NA Available
Unified experience
Hybrid data ingestion NA Available
Azure Synapse Studio NA Available
Instant Clarity
Azure Synapse Link NA Available
Unmatched security
Column- and row-level security Available NA
Dynamic data masking Available NA
Private endpoints Available NA
The predictive analytics using AI and machine learning is a critical element in every enterprise customer digital transformation journey. Current solutions involve creating ETL pipelines which are extremely complex, very expensive and challenging to maintain. These pipelines often got significant delay of hours, days, or even weeks, resulting in decisions being made on still data. The barrier between operational databases and analytical systems has been difficult to all come.
Microsoft announced Synapse Link in Microsoft Build 2020 which is an industry\’s first Cloud native implementation of hybrid transaction analytical processing. It reduces the complexity of building and operating end-to-end analytical solutions by enabling a simple, intuitive, visual, no code experience.
Synapse Link is removing the barriers between Azure’s operational databases and Synapse Analytics, so enterprises can immediately get value from the data in those databases without going through a data warehouse first.
It allows you to take your Azure Synapse Analytics and point it directly at your operational database and do T-SQL queries against it without having to copy the data to Synapse. This means you can do real-time analytics without impacting your online or operational systems. This is especially important when you are talking about lots of data at big scale.
Currently, Synapse Link is only available with Microsoft’s Cosmos DB but Microsoft is planning to add support for available in Azure SQL, Azure Database for PostgreSQL  and Azure Database for MySQL in the future.
Read Microsoft documentation of Azure Synapse Analytics : https://docs.microsoft.com/en-us/azure/synapse-analytics/overview-what-is

Mitigate 5XX error using Auto heal feature

Http 5xx error are common errors in Azure App services. There are several reasons that can lead to 5xx response. Some of them are:
1. Requests take long time to execute.
2. Application is experiencing high CPU and memory consumption.
3. Related to Application code issue.
4. Azure platform performed Infrastructure or File server upgrade in the instance.
Considering the HTTP 503 response issue can be mitigated by restarting the App Service to force the initialized behavior, so I think you can consider using the “Auto-Heal” feature:
1. Go to the “Diagnose and solve problems” à  “Diagnostic Tools”

             
2. Select Auto Heal:
3. Enable and set up a rule as illustrated below:

4. Choose the operation as “Recycle process”, then the platform will help to restart the App Service if there are more than 10 HTTP 503 response within 1 minute:

Docker announces collaboration with Azure

Docker today announced that it has extended its strategic collaboration with Microsoft to simplify code to cloud application development for developers and development teams by more closely integrating with Azure Container Instances (ACI). 

Docker and Microsoft’s collaboration extends to other products as well. Docker will add integrations for Visual Studio Code, Microsoft’s widely used free code editor, to let developers who use the tool deploy their code as containers faster. After this collaboration, you can login directly to Azure from Docker CLI, then you can select Docker context. If we have resource group, you can select it or you can create a new resource group. Then, you can run individual or multiple containers using Docker Compose.
docker login Azure

docker context create aci-westus aci --aci-subscription-id xxx --aci-resource-group yyy --aci-location westus

docker context use aci-westus
Tighter integration between Docker and Microsoft developer technologies provides the following productivity benefits:

  1. Easily log into Azure directly from the Docker CLI
  2. Trigger an ACI cloud container service environment to be set up automatically with easy to use defaults and no infrastructure overhead
  3. Switch from a local context to a cloud context to run applications quickly and easily
  4. Simplifies single container and multi-container application development via the Compose specification allowing a developer to invoke fully Docker compatible commands seamlessly for the first time natively within a cloud container service
  5. Provides developer teams the ability to share their work through Docker Hub by sharing their persistent collaborative cloud development environments where they can do remote pair programming and real-time collaborative troubleshooting
For more information & developers can sign up for Docker Desktop & VS Code beta here.

Azure Front Door Deployment using ARM Template

In this article, we will provision Azure Front Door using Arm Template. I have already created two Azure Web Apps which are running in two different regions i.e West Europe & South East Asia region. We will create & configure Azure Front Door to direct the traffic to these web apps.

Follow the below steps to deploy Azure Front Door:

  1. Download this git repo and fill the parameters in azuredeploy.parameters.json as shown below:
  2. {
    \"$schema\": \"https://schema.management.azure.com/schemas/2019-04-01/deploymentParameters.json#\",
    \"contentVersion\": \"1.0.0.0\",
    \"parameters\": {
    \"frontDoorName\": {
    \"value\": \"ashishfrontdoortest\"
    },
    \"dynamicCompression\": {
    \"value\": \"Enabled\"
    },
    \"backendPools1\": {
    \"value\": {
    \"name\": \"backendpool1\",
    \"backends\": [
    {
    \"address\": \"ashishtest1.azurewebsites.net\",
    \"httpPort\": 80,
    \"httpsPort\": 443,
    \"weight\": 50,
    \"priority\": 1,
    \"enabledState\": \"Enabled\"
    },
    {
    \"address\": \"ashishtest2.azurewebsites.net\",
    \"httpPort\": 80,
    \"httpsPort\": 443,
    \"weight\": 50,
    \"priority\": 2,
    \"enabledState\": \"Enabled\"
    }
    ]
    }
    }
    }
    }

  3. Run the below PowerShell command to provision the AFD.
Login-AzureRmAccount
$ResourceGroupName = \"\" #Enter Resource group Name
$AzuredeployFileURL=\"\" #File path of azuredeploy.json
$AzuredeployParametersFile = \"\" #File path of azuredeploy.parameters.json
Set-AzureRmContext -SubscriptionId \"\" #Subscription ID
New-AzureRmResourceGroupDeployment -ResourceGroupName $ResourceGroupName -TemplateFile $AzuredeployFileURL -TemplateParameterFile $AzuredeployParametersFile
Once Azure front Door is deployed, go to browser and navigate the Frontend host URL of AFD. Your request will be routed to Azure Web App.
Go to Azure Portal to check the AFD configuration. Click on the Front Door Designer from left navigation bar and open Frontends/domains.

Here you can enable SESSION AFFINITY & WEB APPLICATION FIREWALL
Now open backend pools as illustrated below. Here you can update your backend pools configuration.
Last section is routing rule which maps your frontend host and a matching URL path pattern to a specific backend pool.
Here you can configure URL rewrite, Caching, Dynamic compression, Query String caching behavior etc.

Application Change Analysis

Application change analysis will provide you a centralized view along with the analysis of all the recent changes for different components of a web app and its dependencies. Suppose you have noticed some downtime in your app caused by a changed App Setting, but you do not know what has caused the issue. So, you can enable this feature which help to identify the changes made to web application.
The changes it includes are both infrastructure and deployment. The changes are stored in azure storage called Azure Resource Graph database which includes infrastructure level changes. Another source that saves the changes is App Services back-end.
It takes the snapshot of your web app for every 4 hours. It clearly tells you who made the change and what it is in detail with date-time stamp. It is useful especially when multiple teams are working on same project.
Currently this feature is in public preview.

How to enable Change Analysis Feature

  • Navigate to your Azure Web App in the Azure Portal
  • Select Diagnose and Solve problems from the Overview Page and click on Health Check

  • Click on Application Changes as shown in below image.
  • It will open Application Changes and now enable your application changes as illustrated below.

  • Whenever there will be any changes in the application, you can go to Application Changes again and click on Scan changes now.

Difference between Azure Front Door Service and Traffic Manager

Azure Front Door Service is Microsoft’s highly available and scalable web application acceleration platform and global HTTP(s) load balancer. Azure Front Door Service supports Dynamic Site Acceleration (DSA), SSL offloading and end to end SSL, Web Application Firewall, cookie-based session affinity, URL path-based routing, free certificates and multiple domain management.

In this article, I will compare Azure Front Door to Azure Traffic Manager in terms of performance and functionality.

Similarity:

Azure Front Door service can be compared to Azure Traffic Manager in a way that this also provides global HTTP load balancing to distribute traffic across different Azure regions, cloud providers or even with your on-premises.

Both AFD & Traffic Manager support:

  1. Multi-geo redundancy: If one region goes down, traffic routes to the closest region without any intervention.
  2. Closest region routing: Traffic is automatically routed to the closest region.

Differences:

  1. Azure Front Door provides TLS protocol termination (SSL offload), and Azure Traffic Manager does not. It means AFDs take load off from the Web Front Ends, which do not have to encrypt or decrypt the request.
  2. Azure Front Door provides application layer processing, and Azure Traffic Manager does not.
  3. While using AFS, user will experience better performance than traffic manager as AFD uses Anycast, which provides lower latency, thereby providing higher performance.
  4. AFD provides WAF feature for your application to provide security from DDoS attacks.
  5. We can perform URL rewriting in Azure Front Door but not in Traffic Manager.
  6. Traffic manager relies on DNS lookup for network routing while AFD uses reverse proxy which provides faster failover support.
  7. AFD caches the static content while no caching mechanism is available in Traffic Manager.

Quick Summary:

Azure Front Door Traffic Manager
Cross region redirection & availability. Cross region redirection & availability.
SSL offload No SSL offload
Uses Reverse proxy Uses DNS lookup
Caches static content No caching available
Uses AnyCast & Split TCP Does not use such service
AFD provides WAF feature No such feature
99.99% SLA 99.99% SLA

I hope this information helped you. In our next article, we will discuss how to create and use Azure Front Door service.

Cryptocurrency mining attack against Kubernetes clusters

Cryptojacking is the unauthorized use of someone else’s computer to mine cryptocurrency. Hackers are using ransomware-like tactics and poisoned websites to get your employees’ computers to mine cryptocurrencies. Several vendors in recent days have reported a huge surge in illegal crypto-mining activity involving millions of hijacked computers worldwide.

Kubernetes have been phenomenal in improving developer productivity. With lightweight portable containers, packaging and running application code is effortless. However, while developers and applications can benefit from them, many organizations have knowledge and governance gaps, which can create security gaps.

Some of the Past Cases of Cryptocurrency on Kubernetes cluster:

Tesla Case: The cyber thieves gained access to Tesla\’s Kubernetes administrative console, which exposed access credentials to Tesla\’s AWS environment. Once an attacker gains admin privilege of the Kubernetes cluster, he or she can discover all the services that are running, get into every pod to access processes, inspect files and tokens, and steal secrets managed by the Kubernetes cluster.

Jenkins Case: Hackers used an exploit to install malware on Jenkins servers to perform crypto mining, making over $3 million to date. Although most affected systems were personal computers, it’s a stern warning to enterprise security teams planning to run Jenkins in containerized form that constant monitoring and security is required for business critical applications.

Recently, Azure Security Center detected a new crypto mining campaign that targets specifically Kubernetes environments. What differs this attack from other crypto mining attacks is its scale: within only two hours a malicious container was deployed on tens of Kubernetes clusters.

There are three options for how an attacker can take advantage of the Kubernetes dashboard:

  1. Exposed dashboard: The cluster owner exposed the dashboard to the internet, and the attacker found it by scanning.
  2. The attacker gained access to a single container in the cluster and used the internal networking of the cluster for accessing the dashboard.
  3. Legitimate browsing to the dashboard using cloud or cluster credentials.

How could this be avoided?

As per Microsoft\’s Recommendations, follow the below:

  1. Do not expose the Kubernetes dashboard to the Internet: Exposing the dashboard to the Internet means exposing a management interface.
  2. Apply RBAC in the cluster: When RBAC is enabled, the dashboard’s service account has by default very limited permissions which won’t allow any functionality, including deploying new containers.
  3. Grant only necessary permissions to the service accounts: If the dashboard is used, make sure to apply only necessary permissions to the dashboard’s service account. For example, if the dashboard is used for monitoring only, grant only “get” permissions to the service account.
  4. Allow only trusted images: Enforce deployment of only trusted containers, from trusted registries.

Refer: Azure Kubernetes Services integration with Security Center

Source: https://azure.microsoft.com/en-us/blog/detect-largescale-cryptocurrency-mining-attack-against-kubernetes-clusters/

Deploy Azure CDN in existing Sitecore environment using Arm Template

In this article, we will deploy Azure CDN in existing Sitecore XP environment using Powershell & Arm template.

Refer the below steps to deploy Azure CDN:

1.      Download Azure CDN WDP from dev.sitecore.netand upload the WDP in Azure Storage blob container.
Once it is uploaded, you will find two topology XP & XM. I have selected CDN XP topology for this demo. Then, create a SAS token & save it.

2.      Create a parameters.json file as shown below:

{
\"$schema\": \"https://schema.management.azure.com/schemas/2015-01-01/deploymentParameters.json#\",
\"contentVersion\": \"1.0.0.0\",
\"parameters\": {
\"cdWebAppName\": {
\"value\": \"<>\"
},
\"cdnSKU\": {
\"value\": \"<>\"
},
\"cdnMsDeployPackageUrl\": {
\"value\": \"<>\"
}
}
}

Fill the ARM template parameter
cdWebAppName
Name of CD instance
cdnSKU
Premium_Verizon, Standard_Verizon, Standard_Akamai, Standard_Microsoft
cdnMsDeployPackageUrl
SAS token of CDN WDP
3.      Run the below PowerShell command:
Login-AzAccount

$ResourceGroupName = \"<<Enter Resource group name"

$AzuredeployFileURL=\"https://raw.githubusercontent.com/Sitecore/Sitecore-Azure-Quickstart-Templates/master/CDN%201.0.0/xp/azuredeploy.json\"

$AzuredeployParametersFile = \"<<path of above created parameters.json file"

Set-AzContext -Subscription “<>”

New-AzResourceGroupDeployment -ResourceGroupName $ResourceGroupName -TemplateUri $AzuredeployFileURL -TemplateParameterFile $AzuredeployParametersFile -Verbose

4.      Once the script is executed successfully, go to CD instance & you can see CDN.config file inside AppConfig/Include/CDN folder which consists of below settings:
  • Media.AlwaysIncludeServerUrl
  • Media.MediaLinkServerUrl
  • Media.AlwaysAppendRevision
  • MediaResponse.Cacheability
  • MediaResponse.MaxAge

Copy Data from Azure Data Lake Gen 1 to Gen 2 using Azure Data Factory

Today, we will discuss how to use Azure Data factory to copy data from Azure Data Lake Gen1 into Data Lake Gen2.

Prerequisites:

  1. Azure Data Lake Gen1
  2. Data Factory
  3. Azure storage with Data Lake Gen2 enabled

Refer the below steps to copy your data:

  1. Open your Azure portal and go to Data Factory then click on Author & Monitor.
  2. It will open a Data Integration Application in new tab. Now click on Copy Data.copy2
  3. Fill the details in the Properties page and click Nextcopy3
  4. Select the source, then Create a new connection for Data Lake Gen1copy4
  5. Fill out the required parameters. You can use either Service Principal or Managed Identity for Azure resources to authenticate your Azure Data Lake Storage Gen1.copy5
  6. Test the connection, then click Createcopy6
  7. Select your folder in the Dataset as shown belowcopy7
  8. Select the destination & create a new connection for ADLS Gen2.copy11
  9. Fill out the required parameters. You can use either Service Principal or Managed Identity for Azure resources to authenticate your Azure Data Lake Storage Gen1copy8
  10. Test the connection, then click Create
  11. Select the destination & select the folder in the Dataset then click Next
  12. Check and Verify the Summary, then click Nextcopy9
  13. Pipeline will be executed right away.
  14. Monitor the Status
  15. Navigate to the Monitor tab, and see the progresscopy10
  16. You can also view more details by viewing the Activity Runs and view Details

As always do let us know if you have questions or comments using the comments section below!