There are lots of other ways to build a kube cluster, such as kubeadm, or my favourite Kubernetes the hard way. However, we will create a kube cluster locally on our workstation using Minikube. I should point that all the things I\’ll demo in this course will work the same way irrespective of how the Kube Cluster was built.
Earlier we talked about how to install minikube, lets now if it has really installed by running a minikube command:
$ minikube version
minikube version: v1.0.1
Similarly you check it\’s status:
$ minikube status
host:
kubelet:
apiserver:
kubectl:
To create a new kubecluster, we run (note this can take several minutes):
$ minikube start
If you open up the virtualbox gui, you should see a new vm called minikube running. If you check the status again, you should now see:
$ minikube status
host: Running
kubelet: Running
apiserver: Running
kubectl: Correctly Configured: pointing to minikube-vm at 192.168.99.100
Here it says that minikube has also configured kubectl, that\’s done by making changes to kubectl\’s config file. By default that file is located at ~/.kube/config. We\’ll cover more about this file later in the course. But for now we\’ll confirm that this config file is currently configured to point to minikube\’s kube cluster:
$ kubectl cluster-info
Kubernetes master is running at https://192.168.99.100:8443
KubeDNS is running at https://192.168.99.100:8443/api/v1/proxy/namespaces/kube-system/services/kube-dns
To further debug and diagnose cluster problems, use \’kubectl cluster-info dump\’.
The ip address shown here is the Minikube VM\’s ip address, which should match:
$ minikube ip
192.168.99.100
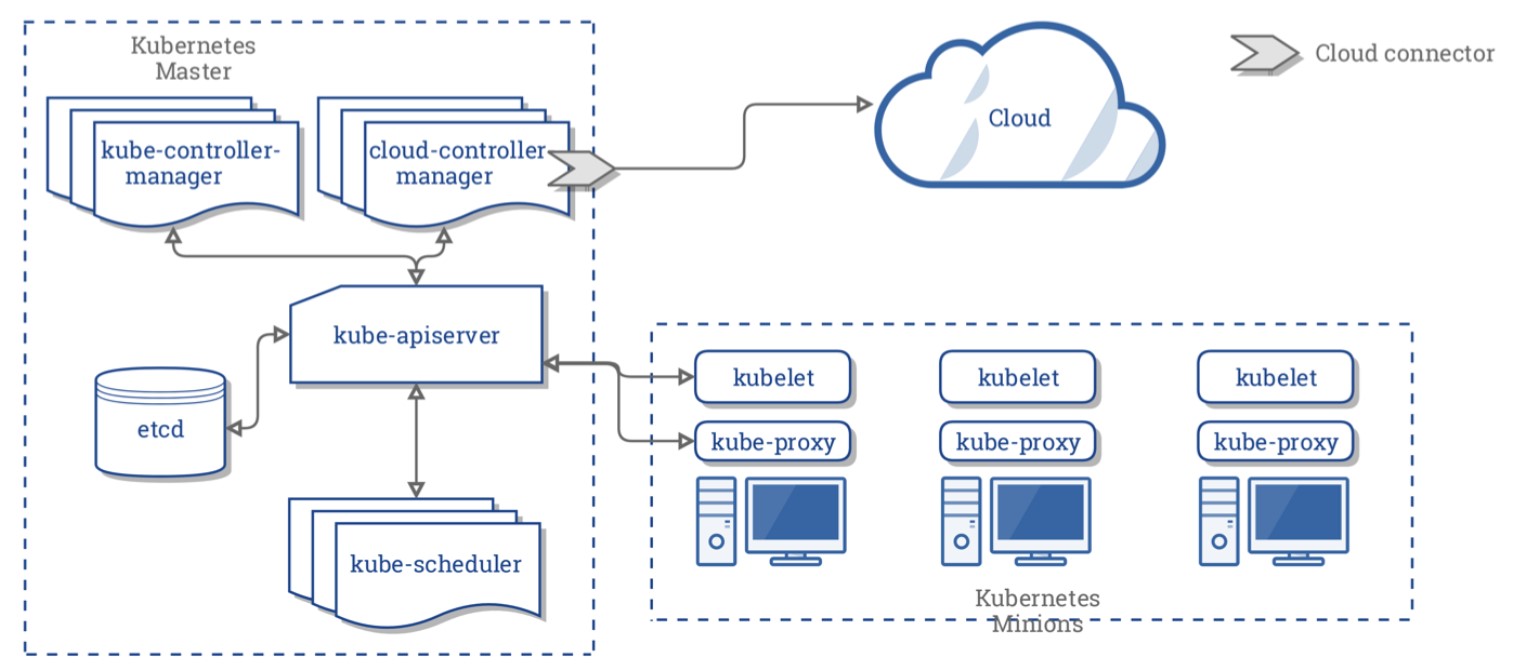
To check the health of your kub cluster\’s control plane, you can run:
$ kubectl get componentstatus
NAME STATUS MESSAGE ERROR
controller-manager Healthy ok
scheduler Healthy ok
etcd-0 Healthy {\”health\”:\”true\”}
Also to see how many nodes are in our kubecluster, run:
$ kubectl get nodes
NAME STATUS ROLES AGE VERSION
minikube Ready master 4d10h v1.14.1
This command lists out all VMs that has the kubelet component running on it, along with the kubelet\’s VERSION. If you built kubernetes the hardway then the masters won\’t get listed here, since the masters don\’t have the kubelet running on them. We can specify the \’wide\’ output setting to display a little some more info:
$ kubectl get nodes -o wide
NAME STATUS ROLES AGE VERSION INTERNAL-IP EXTERNAL-IP OS-IMAGE KERNEL-VERSION CONTAINER-RUNTIME
minikube Ready master 20h v1.14.0 10.0.2.15 <none> Buildroot 2018.05 4.15.0 docker://18.6.2
Now that we have a kubecluster in place, we can now run the kubectl version command but this time without the –client filter flag:
$ kubectl version –short
Client Version: v1.14.1
Server Version: v1.14.1
By design, to stay lightweight, our minikube based kubecluster is a single node cluster, which acts as both the master and worker node. That\’s fine in a development environment. But in production, you should have multiple node cluster for High Availability, better performance, more CPU+RAM capacity,..etc.
When your not using minikube, you can shut it down:
minikube stop
You can also delete your minikube vm:
minikube delete
The Kubernetes dashboard
You can also monitor your kubecluster via the web browser, bu running:
$ minikube dashboard
This is a really cool tool that let\’s you view and manage your Kubecluster visually. I encourage you to explore this tool as we progress through the course.