Top 50 Microsoft Azure Blogs, Websites & Influencers in 2020

I am really glad to share that my blog is listed among Top 50 Microsoft Azure Blogs, Websites & Influencers in 2020. I am honored to be on this huge list next to other top contributors out of Microsoft Azure communities.

Check out the list and browse through all the great Azure blogs: https://blog.feedspot.com/microsoft_azure_blogs/

Azure Heroes: Content Hero & Community Hero Badger

Today I was awarded with 2 Azure Heroes: Content Hero badger & Community Hero Badger.

If you are not aware of what the Azure Heroes program is, let me explain it to you. Azure Heroes is a new recognition program by Microsoft, which recognizes the members of the technical community with digital badgers for meaningful acts of impact. It’s a blockchain-based recognition program where Microsoft collaborated with Enjin, this blockchain technology is being used for issuance and transactions which means that as a recipient of tokenised badger, you take the ownership of a digital collectible in the form of a non-fungible token (NFT).


Content Hero badgers are given out to those who share valuable knowledge at conferences, meetups or other events. The recipients of this rare award have created original content, sample code or learning resources and documented and shared their experiences and lessons to help others to build on Azure.


Community Hero badgers are given out for contributing materially by organising meetups or conferences or by sharing content and being an active member of the community.

Check other badger categories: Azure Heroes

Find All Azure Heroes: https://www.azureheroes.community/map

My Profile: https://www.azureheroes.community/user/11387

Security Recommendations for Azure App Services

In this article, we will cover the security recommendations that you should follow for establishing a secure baseline configuration for Microsoft Azure App Services on your Azure Subscription.

1. Ensure that App Service’s stack settings should be latest

Newer versions may contain security enhancements and additional functionality. Using the latest software version is recommended to take advantage of enhancements and new capabilities. With each software installation, organizations need to determine if a given update meets their requirements and verify the compatibility and support provided for any additional software against the update revision that is selected.

Steps:

1. Open your App Service and click on Configuration under Settings section.

2. Go to General Settings and ensure that your stack should be set to latest version. In the below example, our stack is PHP. Hence, we will select latest PHP version i.e. PHP 7.4


Similarly, in case you are using other stacks like .Net, Python, Java etc. then make sure it should set to latest version. Periodically newer versions are released for software either due to security flaws or to include additional functionality. Using the latest version for web apps is recommended to take advantage of security fixes, if any, and/or additional functionalities of the newer version.

2. HTTP version should be latest

Newer versions may contain security enhancements and additional functionality. Using the latest version is recommended to take advantage of enhancements and new capabilities. With each software installation, organizations need to determine if a given update meets their requirements and also verify the compatibility and support provided for any additional software against the update revision that is selected. HTTP 2.0 has additional performance improvements on the head-of-line blocking problem of old HTTP version, header compression, and prioritization of requests. HTTP 2.0 no longer supports HTTP 1.1\’s chunked transfer encoding mechanism, as it provides its own, more efficient, mechanisms for data streaming.

Steps:

1. Open your App Service and click on Configuration under Settings section.

2. Go to General Settings and ensure that HTTP version should be set to latest version. In the below example, the latest HTTP version is 2.0.

3. Disable FTP deployments

Azure FTP deployment endpoints are public. An attacker listening to traffic on a Wi-Fi network used by a remote employee or a corporate network could see login traffic in cleartext which would then grant them full control of the code base of the app or service. This finding is more severe if User Credentials for deployment are set at the subscription level rather than using the default Application Credentials which are unique per App.

Steps:

1. Open your App Service and click on Configuration under Settings section.

2. Go to General Settings and ensure that FTP state should not be All Allowed.


4. Enable Client Certificates mode

Client certificates allow for the app to request a certificate for incoming requests. Only clients that have a valid certificate will be able to reach the app. The TLS mutual authentication technique in enterprise environments ensures the authenticity of clients to the server. If incoming client certificates are enabled, then only an authenticated client who has valid certificates can access the app.

Steps:

1. Open your App Service and click on Configuration under Settings section.

2. Go to General Settings and ensure that Client certificate mode should be set to Require.


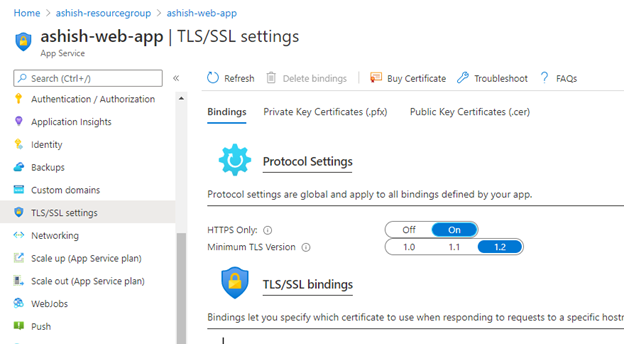
5. Redirect HTTP traffic to HTTPS

Enabling HTTPS-only traffic will redirect all non-secure HTTP request to HTTPS ports. HTTPS uses the SSL/TLS protocol to provide a secure connection, which is both encrypted and authenticated. So it is important to support HTTPS for the security benefits.

Steps:

1. Open your App Service and click on TLS/SSL settings under Settings section.

2. Go to Bindings and set HTTPS Only to ON.

When it is enabled, every incoming HTTP request are redirected to the HTTPS port. It means an extra level of security will be added to the HTTP requests made to the app.


6. Use the latest version of TLS encryption

The TLS(Transport Layer Security) protocol secures transmission of data over the internet using standard encryption technology. Encryption should be set with the latest version of TLS. App service allows TLS 1.2 by default, which is the recommended TLS level by industry standards, such as PCI DSS. App service currently allows the web app to set TLS versions 1.0, 1.1 and 1.2. It is highly recommended to use the latest TLS 1.2 version for web app secure connections.

Steps:

1. Open your App Service and click on TLS/SSL settings under Settings section.

2. Go to Bindings and ensure that TLS Version should be latest version. Here the latest version is 1.2.


7. Enable App Service Authentication

Azure App Service Authentication is a feature that can prevent anonymous HTTP requests from reaching the API app, or authenticate those that have tokens before they reach the API app.

By Enabling App Service Authentication, every incoming HTTP request passes through it before being handled by the application code. It also handles authentication of users with the specified provider(Azure Active Directory, Facebook, Google, Microsoft Account, and Twitter), validation, storing and refreshing of tokens, managing the authenticated sessions, and injecting identity information into request headers.

Steps:

1. Open your App Service and click on Authentication / Authorization under Settings section.

2. Set App Service Authentication to ON

If an anonymous request is received from a browser, App Service will redirect to a logon page. To handle the logon process, a choice from a set of identity providers can be made, or a custom authentication mechanism can be implemented.


8. Enable System Assigned Managed Identity

Managed service identity in App Service makes the app more secure by eliminating secrets from the app, such as credentials in the connection strings. When registering with Azure Active Directory in the app service, the app will connect to other Azure services securely without the need of username and passwords.

Steps:

1. Open your App Service and click on Identity under Settings section.

2. Set the Status to ON


References:

https://docs.microsoft.com/en-us/azure/app-service/web-sites-configure#general-settings

https://docs.microsoft.com/en-us/azure/security/benchmarks/security-controls-v2-governance-strategy#gs-6-define-identity-and-privileged-access-strategy

https://docs.microsoft.com/en-us/azure/app-service/app-service-authentication-overview

https://docs.microsoft.com/en-us/azure/security/benchmarks/security-controls-v2-identity-management#im-1-standardize-azure-active-directory-as-the-central-identity-and-authentication-system


Security Recommendations for Azure SQL Database

In this article, we will cover the security recommendations that you should follow for establishing a secure baseline configuration for Microsoft Azure SQL Services on your Azure Subscription.

1. Enable auditing on SQL Servers & SQL databases:

The Azure platform allows you to create a SQL server as a service. Enabling auditing at the server level ensures that all existing and newly created databases on the SQL server instance are audited.
Auditing tracks database events and writes them to an audit log in your Azure storage account. It also helps you to maintain regulatory compliance, understand database activity, and gain insight into discrepancies and anomalies that could indicate business concerns or suspected security violations.

Steps:

For Azure SQL Server:
1. Go to Azure SQL Server and click on Auditing.
2. Enable Azure SQL Auditing and select your Storage account. You can also select either Log analytics or Event Hub.
For Azure SQL Database:
1. Go to Azure SQL Server and click on Auditing.
2. Enable Azure SQL Auditing and select your Storage account. You can also select either Log analytics or Event Hub.

2. Enable threat detection on SQL Servers & SQL databases:

SQL Threat Detection provides a new layer of security, which enables customers to detect and respond to potential threats as they occur by providing security alerts on anomalous activities. Users will receive an alert upon suspicious database activities, potential vulnerabilities, and SQL injection attacks, as well as anomalous database access patterns. SQL Threat Detection alerts provide details of suspicious activity and recommend action on how to investigate and mitigate the threat.

Steps:

1. Go to Azure SQL server and click on Security Center.
2. Enable AZURE DEFENDER FOR SQL.
3. Select your storage account.
4. Enable Periodic recurring scans & enter your email account where you can receive scan reports. Also select to send email notifications to admins & subscription owners.
5. Enter your email account to which alerts will be sent for the detection of anomalous activities as illustrated in below image. Providing the email address to receive alerts ensures that any detection of anomalous activities is reported as soon as possible, making it more likely to mitigate any potential risk sooner. Always enable service and co-administrators to receive security alerts from SQL Server.
6. Set Threat Detection types to All. Enabling all threat detection types will help you to protect against SQL injection, database vulnerabilities and any other anomalous activities.
You can enable Azure Defender at SQL database level as well but it is recommended to enable Azure Defender at SQL Server level unless you want to generate alerts for the SQL database.

3. Configure Retention policy greater than 90 days.

Ensure that SQL Server & SQL database Audit Retention & Threat Detection Retention should be configured to be greater than 90 days. Audit Logs can be used to check for anomalies and give insight into suspected breaches or misuse of information and access.
Threat Detection Logs can be used to check for suspected attack attempts and breaches on a SQL server with known attack signatures.

4. Use Azure Active Directory Authentication for authentication with SQL Database

Azure Active Directory authentication is a mechanism of connecting to Microsoft Azure SQL Database and SQL Data Warehouse by using identities in Azure Active Directory (Azure AD). With Azure AD authentication, you can centrally manage the identities of database users and other Microsoft services in one central location. Central ID management provides a single place to manage database users and simplifies permission management.
It provides an alternative to SQL Server authentication.
Helps stop the proliferation of user identities across database servers.
Allows password rotation in a single place
Customers can manage database permissions using external (AAD) groups.
It can eliminate storing passwords by enabling integrated Windows authentication and other forms of authentication supported by Azure Active Directory.
Azure AD authentication uses contained database users to authenticate identities at the database level.
Azure AD supports token-based authentication for applications connecting to SQL Database.
Azure AD authentication supports ADFS (domain federation) or native user/password authentication for a local Azure Active Directory without domain synchronization.
Azure AD supports connections from SQL Server Management Studio that use Active Directory Universal Authentication, which includes Multi-Factor Authentication (MFA). MFA includes strong authentication with a range of easy verification options — phone call, text message, smart cards with pin, or mobile app notification.

5. Enable Data encryption on SQL database

Azure SQL Database transparent data encryption helps protect against the threat of malicious activity by performing real-time encryption and decryption of the database, associated backups, and transaction log files at rest without requiring changes to the application.

Steps:

1. Go to Azure SQL Database & select Transparent Data Encryption.
2. Set Data encryption to ON.

References: