Recently, I have organised a virtual session on Azure and AWS cloud certification roadmap.
If you missed the session, refer the below video for complete session:
Recently, I have organised a virtual session on Azure and AWS cloud certification roadmap.
If you missed the session, refer the below video for complete session:


docker login Azure

docker context create aci-westus aci --aci-subscription-id xxx --aci-resource-group yyy --aci-location westus

docker context use aci-westus


{
  \"$schema\": \"https://schema.management.azure.com/schemas/2019-04-01/deploymentParameters.json#\",
  \"contentVersion\": \"1.0.0.0\",
  \"parameters\": {
    \"frontDoorName\": {
      \"value\": \"ashishfrontdoortest\"
    },
    \"dynamicCompression\": {
      \"value\": \"Enabled\"
    },
    \"backendPools1\": {
      \"value\": {
        \"name\": \"backendpool1\",
        \"backends\": [
          {
            \"address\": \"ashishtest1.azurewebsites.net\",
            \"httpPort\": 80,
            \"httpsPort\": 443,
            \"weight\": 50,
            \"priority\": 1,
            \"enabledState\": \"Enabled\"
          },
          {
            \"address\": \"ashishtest2.azurewebsites.net\",
            \"httpPort\": 80,
            \"httpsPort\": 443,
            \"weight\": 50,
            \"priority\": 2,
            \"enabledState\": \"Enabled\"
          }
        ]
      }
    }
  }
}
Login-AzureRmAccount
$ResourceGroupName = \"\" #Enter Resource group Name
$AzuredeployFileURL=\"\" #File path of azuredeploy.json
$AzuredeployParametersFile = \"\" #File path of azuredeploy.parameters.json
Set-AzureRmContext -SubscriptionId \"\" #Subscription ID
New-AzureRmResourceGroupDeployment -ResourceGroupName $ResourceGroupName -TemplateFile $AzuredeployFileURL -TemplateParameterFile $AzuredeployParametersFile


In this article, I will compare Azure Front Door to Azure Traffic Manager in terms of performance and functionality.

Similarity:
Azure Front Door service can be compared to Azure Traffic Manager in a way that this also provides global HTTP load balancing to distribute traffic across different Azure regions, cloud providers or even with your on-premises.
Both AFD & Traffic Manager support:
Differences:
Quick Summary:
| Azure Front Door | Traffic Manager |
| Cross region redirection & availability. | Cross region redirection & availability. |
| SSL offload | No SSL offload |
| Uses Reverse proxy | Uses DNS lookup |
| Caches static content | No caching available |
| Uses AnyCast & Split TCP | Does not use such service |
| AFD provides WAF feature | No such feature |
| 99.99% SLA | 99.99% SLA |
I hope this information helped you. In our next article, we will discuss how to create and use Azure Front Door service.
Refer the below steps to deploy Azure CDN:


{
  \"$schema\": \"https://schema.management.azure.com/schemas/2015-01-01/deploymentParameters.json#\",
  \"contentVersion\": \"1.0.0.0\",
  \"parameters\": {
    \"cdWebAppName\": {
      \"value\": \"<>\"
    },
    \"cdnSKU\": {
      \"value\": \"<>\"
    },
    \"cdnMsDeployPackageUrl\": {
      \"value\": \"<>\"
    }
  }
}
|
cdWebAppName
|
Name of CD instance
|
|
cdnSKU
|
Premium_Verizon, Standard_Verizon, Standard_Akamai, Standard_Microsoft
|
|
cdnMsDeployPackageUrl
|
SAS token of CDN WDP
|
Login-AzAccount

$ResourceGroupName = \"<<Enter Resource group name"

$AzuredeployFileURL=\"https://raw.githubusercontent.com/Sitecore/Sitecore-Azure-Quickstart-Templates/master/CDN%201.0.0/xp/azuredeploy.json\"

$AzuredeployParametersFile = \"<<path of above created parameters.json file"

Set-AzContext -Subscription “<>”

New-AzResourceGroupDeployment -ResourceGroupName $ResourceGroupName -TemplateUri $AzuredeployFileURL -TemplateParameterFile $AzuredeployParametersFile -Verbose

For more details about CDN setup in Sitecore refer the below articles:
https://doc.sitecore.com/developers/92/sitecore-experience-manager/en/enabling-cdn.html
https://doc.sitecore.com/developers/93/sitecore-experience-manager/en/cdn-setup-considerations.html
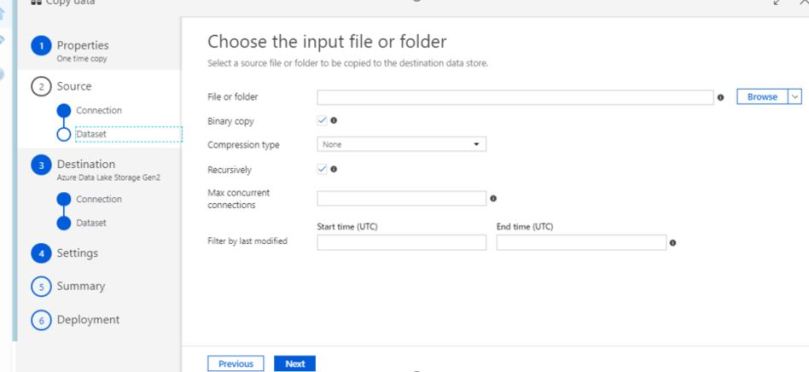
Prerequisites:
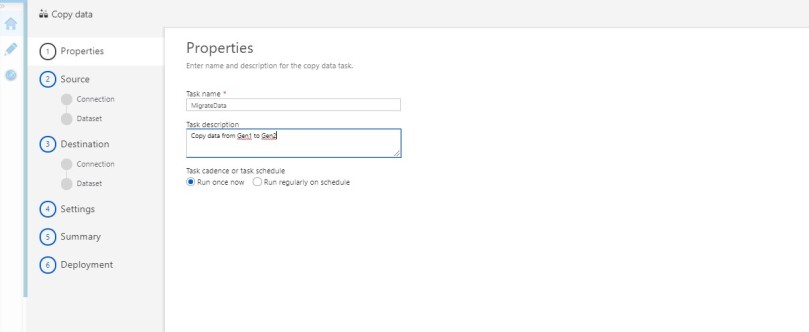
Refer the below steps to copy your data:


As always do let us know if you have questions or comments using the comments section below!
Microsoft provides a good documentation which describes load-balancing options in Azure. Here is a quick summary of load-balancing options in Azure.
| Options | Azure Front Door | Traffic Manager | Application Gateway | Azure Load Balancer |
| Description | It offers Layer 7 capabilities for your application like SSL offload, path-based routing, fast failover, caching, etc. to improve performance and high-availability of your applications. | DNS-based traffic load balancer that enables you to distribute traffic optimally to services across global Azure regions, while providing high availability and responsiveness. | Provides application delivery controller (ADC) as a service, offering various Layer 7 load-balancing capabilities. | Zone-redundant, high-performance, low-latency Layer 4 load-balancing service (inbound and outbound) for all UDP and TCP protocols. |
| OSI Layer | Layer 7 (Application Layer) | Layer 7 (Application Layer) | Layer 4 (Transport Layer) | |
| Global/regional | Global | Global | Regional | Regional |
| Traffic type | HTTP(S) | non-HTTP(S) | HTTP(S) | non-HTTP(S) |
| SLA | 99.99% | 99.99% | 99.95% | 99.99% |
| Routing | Reverse proxy. AFD uses reverse proxy which provides faster failover support. Also uses AnyCast & Split TCP. | DNS routing. DNS-based load-balancing service that operates only at the domain level. | It acts as a reverse proxy service. This terminates the client connection and forwards request to back endpoints. | This provides network level distribution but essentially only with the same azure data centre. |
| SSL Offload | Available | Available | ||
| WAF features | Available | Available | ||
| Caching | Available |
The following flowchart is really helpful to identify best load balancing option for your application.
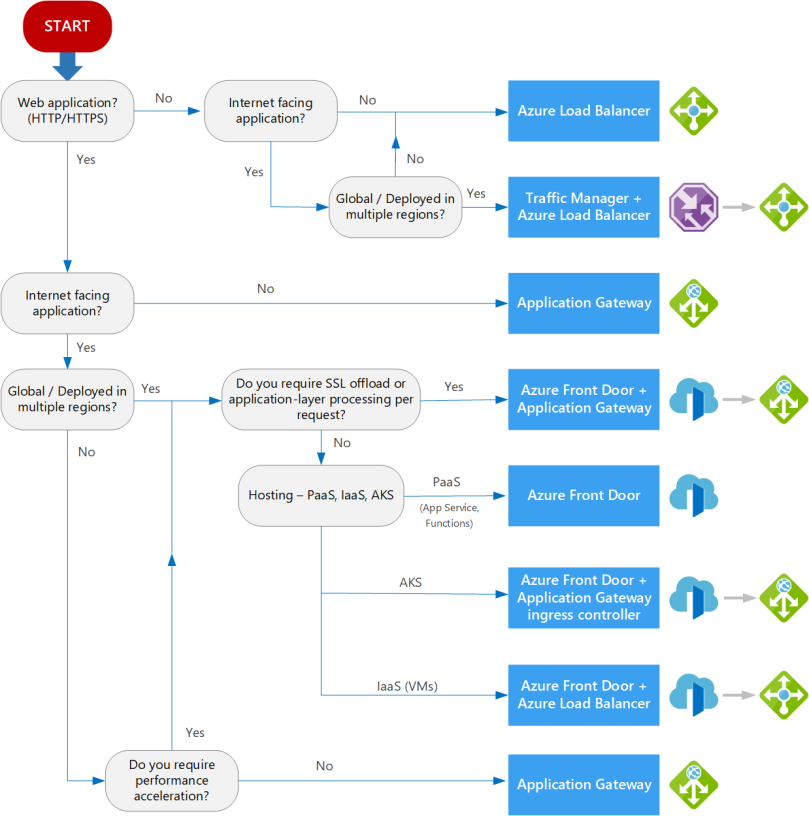
Source: https://docs.microsoft.com/en-us/azure/architecture/guide/technology-choices/load-balancing-overview
You may refer the below articles for Docker image & Azure container registry.
NOTE: We will use Azure CLI hence install Azure CLI version 2.0.29 or later. Run az –version to find the version.
az account set --s <>
2. If you have an existing resource group, you can skip this step else you can create a new resource group.
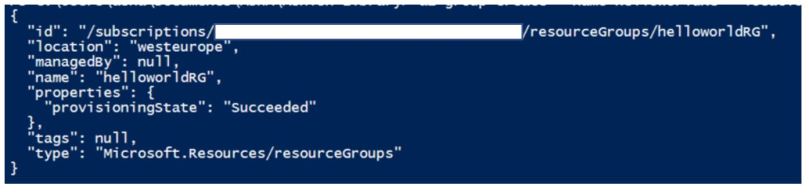
az group create --name <> --location <>
Example:
az group create --name helloworldRG --location westeurope
az aks create --resource-group <> --name <> --node-count <> --enable-addons monitoring --generate-ssh-keys --node-resource-group <>
Example:
az aks create --resource-group helloworldRG --name helloworldAKS2809 --node-count 1 --enable-addons monitoring --generate-ssh-keys --node-resource-group helloworldNodeRG
While creating an AKS cluster, one more resource group is also created to store AKS resource. For more details, refer Why are two resource groups created with AKS?
az aks get-credentials --resource-group <> --name <>
Example:
az aks get-credentials --name \"helloworldAKS2809\" --resource-group \"helloworldRG\"
To verify your connection, run the below command to get nodes.
kubectl get nodes

az aks update -n myAKSCluster -g myResourceGroup --attach-acr
Example
az aks update -n helloworldAKS2809 -g helloworldRG --attach-acr helloworldACR1809
Create a file hellowordapp.yaml and copy the below content in the file.
apiVersion: apps/v1
kind: Deployment
metadata:
  name: helloworldapp
  labels:
    app: helloworldapp
spec:
  replicas: 3
  selector:
    matchLabels:
      app: helloworldapp
  template:
    metadata:
      labels:
        app: helloworldapp
    spec:
      containers:
      - name: hellositecore2705
        image: helloworldacr1809.azurecr.io/helloworldapp:latest
        ports:
        - containerPort: 8080
apiVersion: v1
kind: Service
metadata:
  name: helloworldapp
spec:
  selector:
    app: helloworldapp
  ports:
    - protocol: TCP
      port: 80
      targetPort: 8080
spec:
  type: LoadBalancer
  ports:
  - port: 80
  selector:
    app: helloworldapp
You can refer Yaml validator to check your yaml file.
It’s time to deploy our docker image from ACS to AKS.
kubectl apply -f <>
Example:
kubectl apply -f hellowordapp.yaml
To get the external IP run the command.
kubectl get service helloworldapp

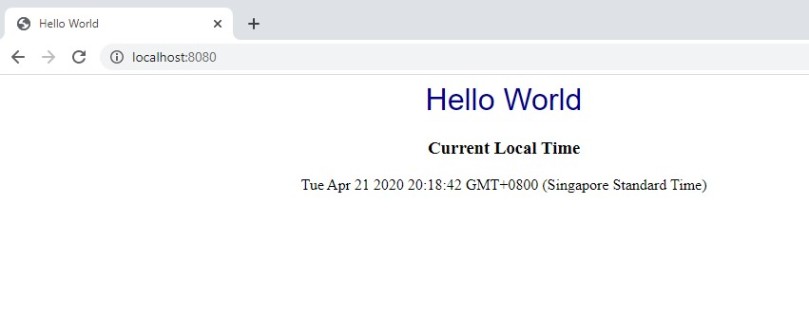
Open the web Brower and navigate to your external IP. The web page will be opened as shown below:
I hope this information helped you. If you have any feedback, questions or suggestions for improvement please let me know in the comments section.
NOTE: We will use Azure CLI hence install Azure CLI version 2.0.29 or later. Run az –version to find the version.
az account set --s <>
az group create --name --location
Example:
az group create --name helloworldRG --location westeurope
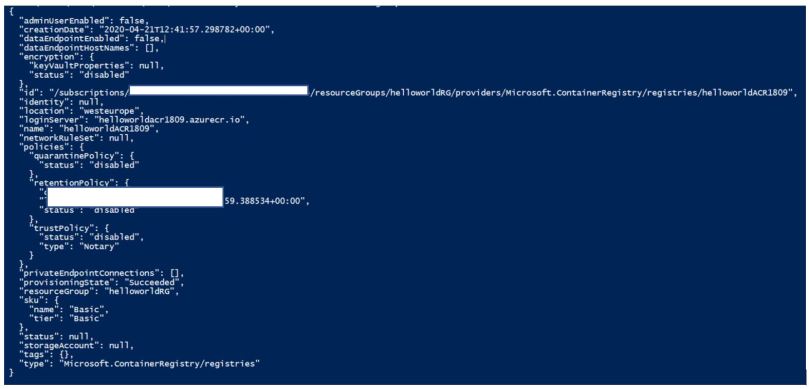
az acr create --resource-group --name --sku Basic
Example:
az acr create --resource-group helloworldRG --name helloworldACR1809 --sku Basic
az acr login --name <>
Example:
az acr login --name helloworldACR1809
To push a container image to Azure Container Registry, you must first tag the image with registry\’s login server.
Run the below commands:
docker images

Tag container image
docker tag /:
Example:
docker tag helloworldapp helloworldacr1809.azurecr.io/helloworldapp:latest

Run docker images to validate tagging operation.
Example: docker push helloworldacr1809.azurecr.io/helloworldapp:latest
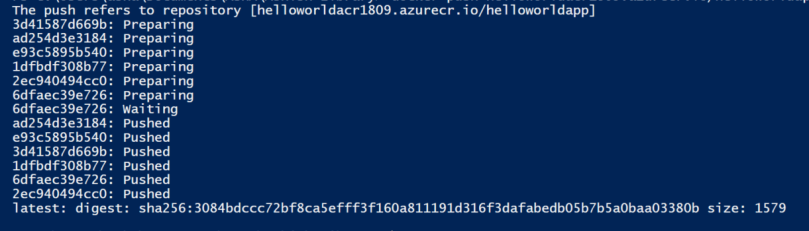
az acr repository list --name --output table
Example:
az acr repository list --name helloworldacr1809
git clone https://github.com/ashish993/helloworld.git
docker build .\\helloworld -t helloworldapp
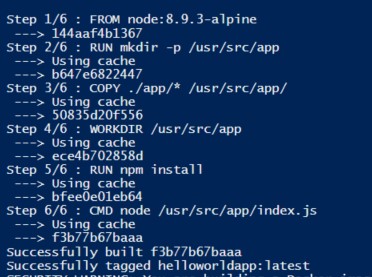
docker images
docker run -d -p 8080:80 helloworldapp
|
Features
|
v1 SKU
|
v2 SKU
|
|
Autoscaling
|
✓
|
|
|
Zone redundancy
|
✓
|
|
|
Static VIP
|
✓
|
|
|
Azure Kubernetes Service (AKS) Ingress controller
|
✓
|
|
|
Azure Key Vault integration
|
✓
|
|
|
Rewrite HTTP(S) headers
|
✓
|
|
|
URL-based routing
|
✓
|
✓
|
|
Multiple-site hosting
|
✓
|
✓
|
|
Traffic redirection
|
✓
|
✓
|
|
Web Application Firewall (WAF)
|
✓
|
✓
|
|
WAF custom rules
|
✓
|
|
|
Transport Layer Security (TLS)/Secure Sockets Layer (SSL) termination
|
✓
|
✓
|
|
End-to-end TLS encryption
|
✓
|
✓
|
|
Session affinity
|
✓
|
✓
|
|
Custom error pages
|
✓
|
✓
|
|
WebSocket support
|
✓
|
✓
|
|
HTTP/2 support
|
✓
|
✓
|
|
Connection draining
|
✓
|
✓
|

To install & configure Minikube, run the below powershell command & you can have a standalone Kubernetes cluster running locally.
<#
.Synopsis
   Install MiniKube + Kubectl
.DESCRIPTION
   This script downloads the executables for MiniKube, Kubectl, configures Hyper-V as the hypervisor (if not configured already)
   together with configuring a specific network adapter for use with the Minikube virtual machine
.EXAMPLE
   Install-MiniKube

#>

## Check if running as a Administrator (needed for Hyper-V commands)
$currentPrincipal = New-Object Security.Principal.WindowsPrincipal([Security.Principal.WindowsIdentity]::GetCurrent())
$currentPrincipal.IsInRole([Security.Principal.WindowsBuiltInRole]::Administrator)

## Check HyperV status
$HypervState = (Get-WindowsOptionalFeature -Online -FeatureName:Microsoft-Hyper-V).State

## If missing, enable HyperV
if ($HypervState -eq \"Disabled\")
    {
       $EnableHyperV = Enable-WindowsOptionalFeature -Online -FeatureName:Microsoft-Hyper-V-Management-Powershell,Microsoft-Hyper-V-All -NoRestart

       ## If a restart is needed, add registry entry to continue after reboot
       if ($EnableHyperV.RestartNeeded -eq $true)
          {
            ## Set script to re-run after reboot
            Set-ItemProperty -Path \"HKLM:\\Software\\Microsoft\\Windows\\CurrentVersion\\RunOnce\" -Name \"Install-MiniKube\" -Value \"C:\\Windows\\system32\\WindowsPowerShell\\v1.0\\Powershell.exe $PSCommandPath\"

            ## And reboot
            Restart-Computer
          }
    }

## Get version number of latest stable release of kubectl
$KubectlVersion = (Invoke-WebRequest -uri https://storage.googleapis.com/kubernetes-release/release/stable.txt -UseBasicParsing).content.Trim()

## Turn off progress bars to speed up incoming download *sigh*
$ProgressPreference = \"silentlyContinue\"

## Download minikube + kubectl to temp location
$MinikubeUrl = \"https://storage.googleapis.com/minikube/releases/latest/minikube-windows-amd64.exe\"
$MinikubeDl = \"$Env:Temp\\minikube.exe\"
$KubctlUrl = \"https://storage.googleapis.com/kubernetes-release/release/$KubectlVersion/bin/windows/amd64/kubectl.exe\"
$KubctlDl = \"$Env:Temp\\kubectl.exe\"

Invoke-WebRequest -uri $MinikubeUrl -OutFile $MinikubeDl
Invoke-WebRequest -uri $KubctlUrl -OutFile $KubctlDl

## Restore progress bars to default
$ProgressPreference = \"Continue\"

## Create and copy downloads to Minikube directory in Program Files
$MinikubeDst = \"$Env:Programfiles\\Minikube\"

New-Item $MinikubeDst -ItemType Container
Move-Item $MinikubeDl -Destination $MinikubeDst
Move-Item $KubctlDl -Destination $MinikubeDst

## Update PATH environment variable for this session
$env:Path +=\";$MinikubeDst\"

## Update PATH environment variable permentantly
[Environment]::SetEnvironmentVariable(\"Path\", $env:Path + \";$MinikubeDst\", [EnvironmentVariableTarget]::Machine)

## Check for and clear out any previous MiniKube configurations
if (Test-Path -Path \"$HOME\\.minikube\")
    {
      Remove-Item -Path \"$HOME\\.minikube\" -Force -Recurse
    }

## Get Network Adapter of choice for use with MiniKube
$NetworkAdapter = Get-NetAdapter | Out-GridView -OutputMode Single -Title \'Pick your network adapter to use with MiniKube\'

## Configure Hyper-V Virtual Switch with Network Adapter chosen previously
New-VMSwitch -Name \"Minikube\" -AllowManagementOS $true -NetAdapterName $NetworkAdapter.Name

## Configure Minikube to use Hyper-V driver and Virtual Network Adapter
minikube config set vm-driver hyperv
minikube config set hyperv-virtual-switch Minikube
minikube config set memory 2048

## Start MiniKube
minikube start
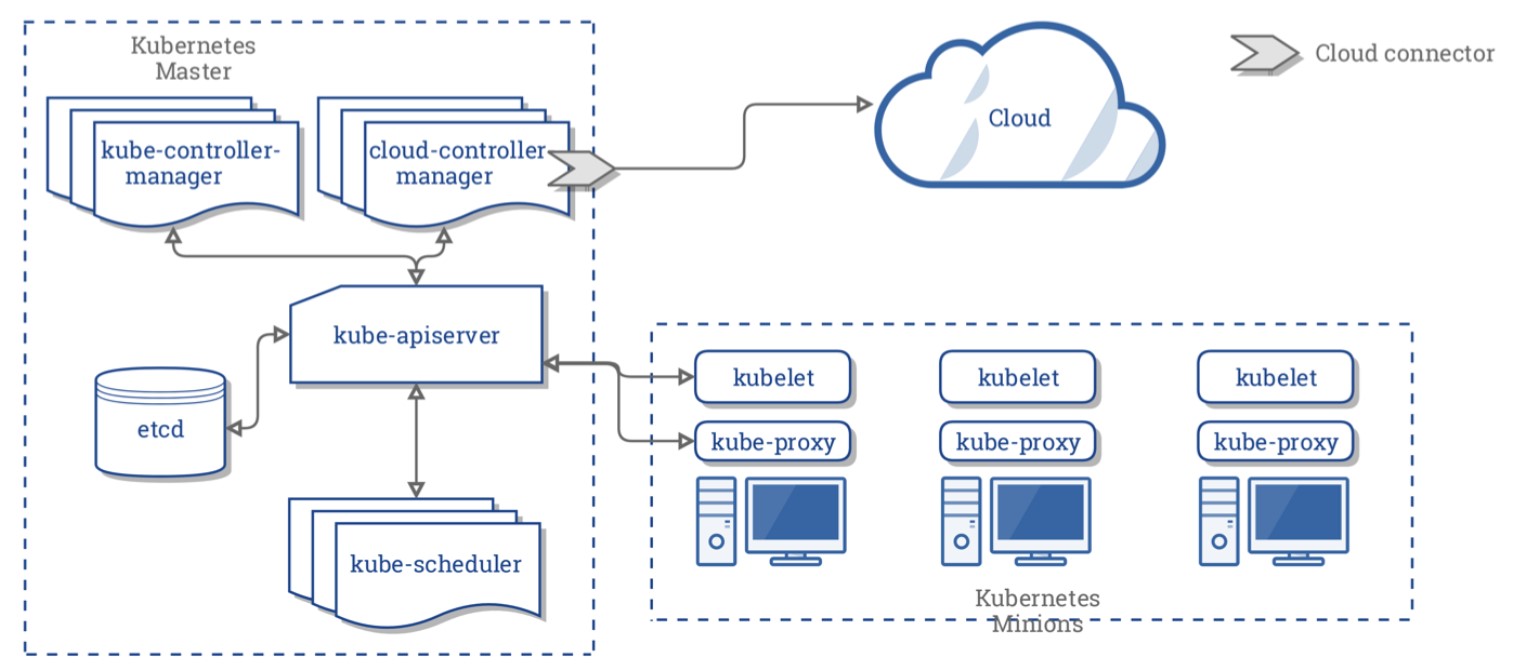
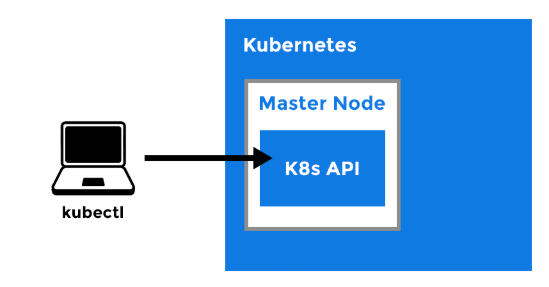
Kubernetes is made of a central manager (master) and some worker nodes, although both can run in a single machine or node. The manager runs an API server (kube-apiserver), a scheduler (kube-scheduler), controllers and a storage system (etcd).
Kubernetes exposes an API which could be accessible with kubectl or your own client. The scheduler sees the requests for running containers coming to the API and find a node to run that container in. Each node runs a kubelet and a proxy (kube-proxy). Kubelet receives requests tu run containers, manage resources and watches over them in the local node. The proxy creates and manage networking rules to expose the container on the network.
A Pod consist of one or more containers which share an IP address, access to storage and namespace. A container in a pod runs an application, and the secondary containers supports such application.
Orchestration is managed though a series of watch-loops, or controllers that check with the API server for a particular object state, modifying the object until declares the desired state.
A Deployment is a controller that ensures that resources are available, and then deploys a ReplicaSet. The ReplicaSet is a controller which deploys and restart containers until the requested number of containers running. The ReplicationController was deprecated and replaced by Deployment.
There are Jobs and CronJobs controllers to handle single or recurring tasks.
Labels are strings part of the object metadata used to manage the Pods, they can be used to check or changing the state of objects without having to know the name or UID. Nodes can have taints to discourage Pod assignment, unless the Pod has a toleration in the metadata.
There are also annotations in metadata which is information used by third-party agents or tools.
Tools:
• Minikube which runs with VirtualBox to have a local Kubernetes cluster
• kubeadm
• kubectl
• Helm
• Kompose: translate Docker Compose files into Kubernetes manifests
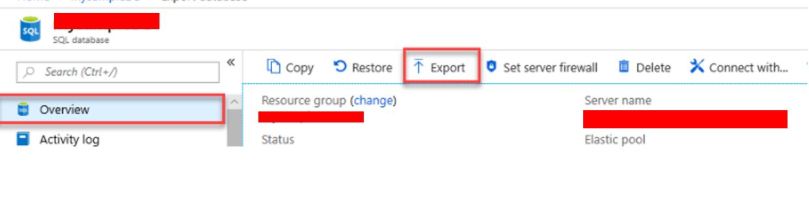
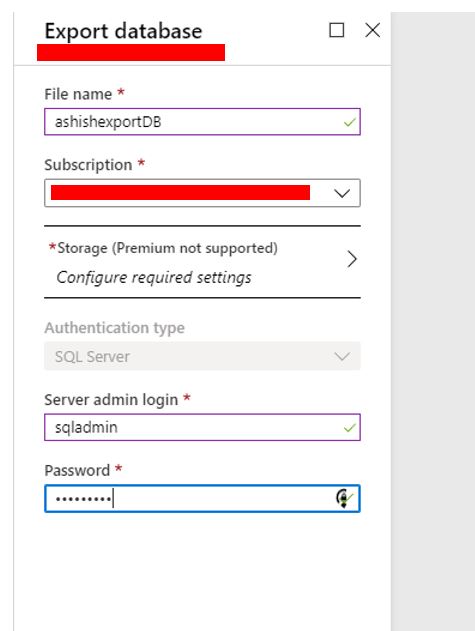
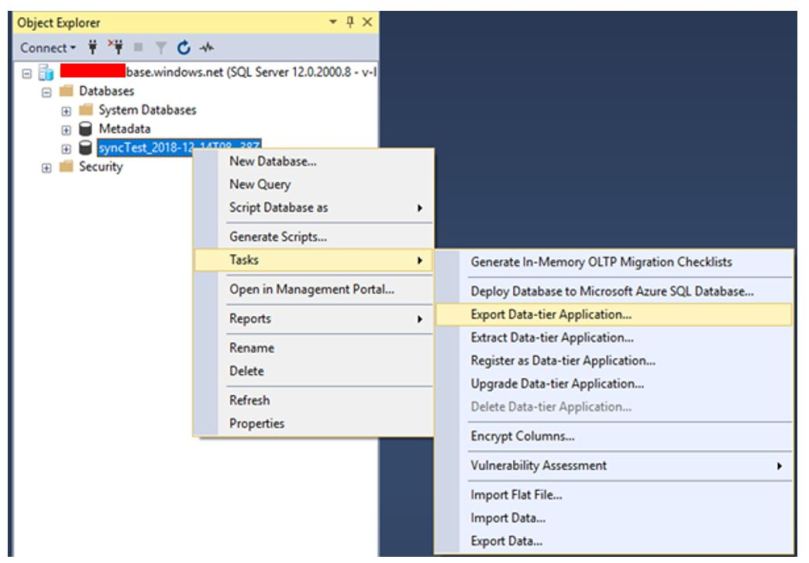
When you need to create an archive of an Azure SQL database, you can export the database schema and data to a BACPAC file. A BACPAC file can be stored in Azure blob storage or in local storage in an on-premises location and later imported back into Azure SQL Database or into a SQL Server on-premises installation.
Let\’s learn some of the ways to export BACPAC file.
There is a command line tool that you can also choose to perform the import/export. The latest version is here. Sqlpackage will be installed to “C:\\Program Files\\Microsoft SQL Server\\150\\DAC\\bin” directory.
Example import/export commands
sqlpackage.exe /Action:Export /ssn:[server].database.windows.net /sdn:[database] /su:[user] /sp:[password] /tf:\”C:\\Temp\\database.bacpac\”
sqlpackage.exe /Action:Import /tsn:[server].database.windows.net /tdn:[database] /tu:[user] /tp:[password] /sf:\”C:\\Temp\\database.bacpac\”
The public documentation introduce SQLPackage utility:
You can use New-AzSqlDatabaseExport cmdlet to export database bacpac file.
Example:
$exportRequest = New-AzSqlDatabaseExport -ResourceGroupName \"RG01\" -ServerName \"Server01\" -DatabaseName \"Database01\" -StorageKeyType \"StorageAccessKey\" -StorageKey \"StorageKey01\" -StorageUri \"http://account01.blob.core.contoso.net/bacpacs/database01.bacpac\" -AdministratorLogin \"User\" -AdministratorLoginPassword \"secure password\"
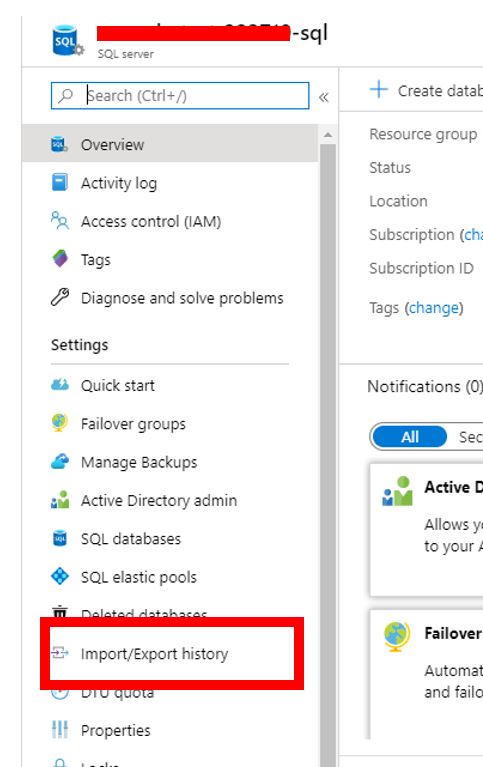
Check the status of Database export using the below command:
$exportStatus = Get-AzSqlDatabaseImportExportStatus -OperationStatusLink $exportRequest.OperationStatusLink [Console]::Write(\"Exporting\") while ($exportStatus.Status -eq \"InProgress\") { Start-Sleep -s 10 $exportStatus = Get-AzSqlDatabaseImportExportStatus -OperationStatusLink $exportRequest.OperationStatusLink [Console]::Write(\".\") } [Console]::WriteLine(\"\") $exportStatus
Sitecore provides REST API references where you can get instant service responses using Xdb API services.
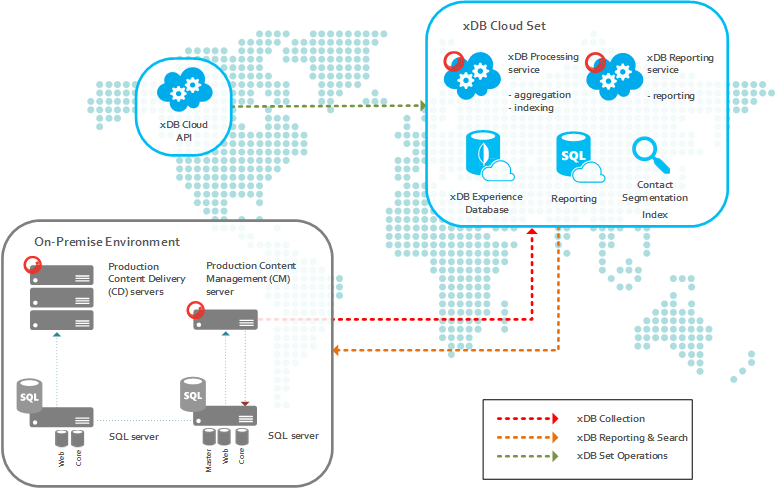
Refer this for detailed explanation for RestAPI for xDB Cloud Service
1. Get connection strings
This endpoint becomes very useful when you haven’t received any information about xDB Cloud like Connection Strings, ReportingService from Sitecore Support. With this method in place, you will be able to get all the information required for your setup.
https://gateway-xdb-scs.cloud.sitecore.net/api/xdb/connectionstrings/{licenseId}/{deploymentId}
2. Get Firewall settings V2
This is also one of the important thing to successfully complete the xDB Cloud setup. Even though you have done all configuration right, but your infrastructure not configured properly, it won’t allow application to connect to MongoDB. Hence, no data will be written to xDB Cloud. Use this endpoint to get all URLs and ports specific to URL. And you have to enable the outbound connections over given ports in Firewall.
https://gateway-xdb-scs.cloud.sitecore.net/api/xdb/firewallsettings/{licenseId}/{deploymentId}?v=2
3. Get history processing status
Once you have triggered the rebuild Reporting database with help of above method and received response as “In Progress”, you will want to know the status of that task to determine weather it got completed successfully or encountered with an error. By triggering this same API as above again, you will get status of that operation in response. Possible values are Done, In Process, Error, and None.
https://gateway-xdb-scs.cloud.sitecore.net/api/xdb/historyProcessing/{licenseId}/{deploymentId}
4. Get version information
This endpoint is useful to get information about xDB set (DeploymentId) such as Sitecore Version, xDB Cloud Version (1.0/2.0), And Deployment Type (Prod/Non Prod).
https://gateway-xdb-scs.cloud.sitecore.net/api/xdb/version/{licenseId}/{deploymentId}
5. Get xDB collection verification dataset
This endpoint also helps like above one to verify weather data is getting stored to xDB Cloud or not by retrieving collections. Collections includes Interactions as well Contacts.
https://gateway-xdb-scs.cloud.sitecore.net/api/xdb/collection/{licenseId}/{deploymentId}
6. Get xDB consumption
You can utilize this endpoint as a tool to verify whether data is getting stored in xDB Cloud or not. By providing year and month in endpoint URL, you will get informations like Total Interactions, Interactions Added, Total Contacts, Contacts Added etc. per day basis.
https://gateway-xdb-scs.cloud.sitecore.net/api/xdb/Consumption/{licenseId}/{deploymentId}/{year}/{month}
7. Get xDB set status
This endpoint will be used to ensure xDB Set (DeploymentId) working well or not. This will return Status, Message, and IssueIdOnError. You will find the message if there is any issue with xDB Set. Make a note of IssueIdOnError if you get that in response because you need to provide it to Sitecore Support team when you contact them about the issue with your xDB Set.
https://gateway-xdb-scs.cloud.sitecore.net/api/xdb/{licenseId}/{deploymentId}/status
8. List xDB sets
Once you have obtained the token, first thing you wish want to get is list of xDB sets. In response you will get all xDB set listed and DeploymentId for each. Once you have noted LicenseId and DeploymentId, you will be able to make API calls to get information specific to xDB set (DeploymentId). This endpoint becomes very handy when you haven’t received DeploymentId(s) from Sitecore Support.
https://gateway-xdb-scs.cloud.sitecore.net/api/xdb/{licenseId}
9. SSO Encode Sitecore license
You must use a valid authentication token whenever you make a call to the xDB Cloud API. Which can be generated by using a valid Sitecore license file to call the SSO Encode Sitecore License endpoint. You must include the generated token as a HTTP header in all other requests called X-ScS-Nexus-Auth
https://gateway-sso-scs.cloud.sitecore.net/api/License/Encode/
10. Trigger history processing (rebuild the Reporting database)
This is a very useful endpoint which will be used to rebuild the Reporting database. Make note that you won’t be able to rebuild the reporting database using admin page in case of xDB Cloud. This is the method which will do the work for you. When calling this method, it should return “In Process” as response. That means rebuild of reporting database for that specific xDB Set has been started.
https://gateway-xdb-scs.cloud.sitecore.net/api/xdb/historyProcessing/{licenseId}/{deploymentId}
11. Cancel history processing
This endpoint is used to cancel rebuild the Reporting database. You should have licenseID and deploymentID to call this endpoint.
https://gateway-xdb-scs.cloud.sitecore.net/api/xdb/cancel/historyProcessing/{licenseId}/{deploymentId}

Below are the some of the useful xDB troubleshooting reference:
1. Determine the interactions for each facet by month, run against your xDB shards:
select facetKey,
DATEPART(year,lastmodified) as ‘Year’,
DATEPART(month,lastmodified) as ‘Month’,
count(distinct interactionId) as ‘NumberOfInteractions’
from [xdb_collection].[InteractionFacets]
group by facetKey, DATEPART(year,lastmodified), DATEPART(month,lastmodified)
order by facetKey, DATEPART(year,lastmodified), DATEPART(month,lastmodified)
2. Determine the number of visits by language and month, run against your reporting database:
select SiteNameId,
DimensionKey,
DATEPART(year,[Date]) as ‘Year’,
DATEPART(month,[Date]) as ‘Month’,
sum(visits) as ‘NumberOfInteractions’
from [dbo].[Fact_LanguageMetrics] lm
inner join [dbo].[DimensionKeys] dk on lm.DimensionKeyId = dk.DimensionKeyId
group by SiteNameId,
DimensionKey,
DATEPART(year,[Date]),
DATEPART(month,[Date])
order by SiteNameId,
DimensionKey,
DATEPART(year,[Date]),
DATEPART(month,[Date])
3. Extract Email addresses from xDB shards:
select c.contactid, c.created, c.LastModified, cf.FacetData, JSON_VALUE(cf.FacetData, ‘$.PreferredEmail.SmtpAddress’) AS Email
from [db-shard0db].[xdb_collection].[ContactFacets] cf
inner join [db-shard0db].[xdb_collection].[Contacts] c on c.ContactId = cf.ContactId
where cf.FacetKey = ‘Emails’
4. Determine xDB data flow and pinpoint/analyze issues:
SELECT *
FROM [xdb_collection].[DeviceProfiles]
where DeviceProfileId like ‘%VALUEFROMCOOKIE%‘
order by LastModified desc
SELECT * from
SELECT * from [xdb_collection] .[Interactions]
where ContactId = ‘XXX’
traces
| where timestamp > ago(30d)
| where operation_Name contains “GET /SESSION END”
For more detailed information related to xDB troubleshooting refer the below document:
Azure service principal is a security identity created within Azure Active Directory & it is used by user-created apps, services, and automation tools to access specific Azure resources. You can assign permissions to the service principal that are different than your own Azure account permissions.
Creating a Service Principal


Assign Role to Service Principal
Powershell script to Login via Service Principal
Fill the parameters & run the below command to login as a Service Principal:
$client_id =\"<>\"
$tenant_id= \"<<Directory ID"
$client_secret=\"<>\"
$secret = ConvertTo-SecureString $client_secret -AsPlainText -Force
$Cred = New-Object System.Management.Automation.PSCredential($client_id, $secret)
Add-AzureRmAccount -Credential $Cred -TenantId $tenant_id -ServicePrincipal
